Here is a list of things I do on every project these days and I highly recommend that you do the same. The result is that: (1) It is very easy for new developers to come up to speed on a project like this to quickly; (2) The installation process for the users of the project is very simple and simple will aid adoption of your product.
Version Control: This should go without saying that you need to have some sort of version control system. Today the version control system of choice is Subversion. You will need a server to host the repository. For open source projects I use code.google.com and for commercial I use Hosted-Projects. Hosted-Projects are just few dollars per month and you get a piece of mind of backups. Don’t forget to check in everything you need into the repository, this includes all of the dependent libraries.
Command Line Build Script: Most of my time I live in Eclipse and it does all of the compilation, unit-test running and code-coverage (EclEmma) for me. Nevertheless you need a command line script for building in the continuous build (usually an Ant Script). Your script should:
Compile code
Compile tests
Generate JavaDoc
Run tests with code coverage: I use Emma or Cobertura.
Generate Reports: Test pass/fail & coverage
Build a distribution JAR.
Continuous Build: I have been on too many projects where the head of the repository does not compile resulting in endless loss of productivity. Always have a rule that whatever is in repository at least compiles (Tests pass is ideal). Use a continuous integration server such as CruiseControl or Hudson. I prefer Hudson because the setup is a no-brainer and it is very powerful and feature rich with lots of nice graphs for your upper-management (BTW Hudson follows the suggestions in here, which is one of the reasons it so great.). You want your continues build to publish the JARs, JavaDoc, Tests Report and Coverage Report which the build script generated. This way there never is doubt as to what is the state of the code-base. If your boss wants to try the latest code he can download it from the continues build.
Automatic Push to Staging: Set up the continuous build so that if the build is successful (tests pass) automatically push the code to staging server. I usually set up a Tomcat server and simply update its WEB-INF directory with the latest code. Tomcat automatically notices new files and refreshes. This gives people an area where to play with the product. You can have your QA use the server or set up a separate one. I usually have a lot of automated tests so I give the URL directly to customer and tell them this is the “ALPHA” server. This is very useful when you are working on a feature, the customer gets to be part of the feature building and can give you input all along as opposed to on the end when it is hard to change anything.
Tests and coverage: Even if you are new to automated tests and unit-testing, I still recommend that you do everything else on this list. But the automated tests bring the whole process to the next level. The benefits you get from automated testing are immense and people have written books on it, so we will not go into it here. If you are new to testing make a “Hello World” tests just so that you get all of the scripts and coverage working with it. This puts all of the infrastructure in place so that once your developers get into writing tests they will have a place to put them. It is very important to run the tests with the continuous build, otherwise your tests will bit-rot.
Default Embedded Web Server: If you are building a web app I recommend Jetty as your web container. The cool thing about Jetty is that you can simply new-it-up in your main method. With Tomcat you have to package up a WAR file and drop the WAR file into the Tomcat directory and wait for Tomcat to “install it”. This makes development as well as deployment complicated. With Jetty you start your application through a main method (just like a normal desktop app) and your main method starts Jetty. Your developers have easier time developing/debugging and your customer has easier time deploying. I usually go a step further and make sure that the JAR file produced is also a WAR file. So if you insist and want to deploy with Tomcat you can. Make it easy for everyone!
Default Embedded Database: Nothing puts me off from tyring an application than a complicated database installation instructions. As a result I use an embeddable database such as HSQLDB. In development and in tests I let the system instantiate an in-memory database, on staging I instantiate a disk-backed version. But in both cases there is nothing for the customer/developer to do; it is part of the main method! I provide a command line option to use external DB such as Oracle in heavy-production.
Automatic Schema Installation: When the application starts the first thing it does is checks if the schema is installed. If not it automatically install the schema. I usually use Hibernate for persistence which does all of this for me. Hibernate even upgrades the schema to newer versions if needed so I never have to worry about the schema in the DB.
GUICE Dependency Injection: If you want a maintainable, testable and easy to understand code-base, you need to use dependency injection (DI) as a design pattern. This should be a no-brainer, but sadly the industry needs to catch up, so be ahead of the industry. If you use DI, then you need an automated DI framework to make your life easier. I use GUICE and I think it is the most advanced DI out there, but there is also PicoContainer and Spring. If you will use DI it will pay huge dividends throughout the project lifetime, especially as the project matures and becomes more complicated.
Easy Installation/Run: Focus on making it easy for the customer to try your product. I like to shock my customers by handing them a JAR file and say “double-click” which starts the JVM, the web-server, the DB, installs the schema, and launches a web-browser which points to the localhost. Or server your application through Java Web Start which does the same one-click process in a web-page. Make it so that there is no need for an installation manual.
Place main class into the JAR MANIFAST so that double clicking will launch your application
No argument launch should bring the application up in “reasonable state”: in-memory-database; install schema; launch web-container; install a default admin user; etc…
What is the end result? You will have happy and productive developers, and happy customers. Make it easy for your customers to switch to your product.
I’ve manage projects, I’ve lead them, I’ve been a developer, I’ve tested, I’ve organized releases, I’ve done all the paperwork. It’s just that lately, that seems to be the role expected from the developer on any given project. Don’t get me wrong, project managers are great. I still have never hired, fired, had to argue for the budget. Yikes! All these things have nothing to do with actually building the software. However, try developing something with no money and no resources. You won’t get very far. A while back, I ran into a great article by Robert Bogue about software development roles –
It has a great layout of all the different roles and tasks in software development. Now I don’t prescribe to the notion that projects require to have all those positions separately staffed. There’s typically overlap, but I do think the roles outline tasks that occur on just about every project. I’ve begun to wonder if all these tasks are falling on the shoulders of developer and wondering why.
First off, let’s take a look at these roles. The diagram of roles –
Obviously, the developer is the developer. That hasn’t changed. In this day and age, the developer is often the lead and solution architect. There may be multiple developers on the team, but customers and management don’t care, pick one to get beat up in status meetings, they’re the lead. I do see architect positions around. I’m not sure what qualifies somebody as an architect. If you are the sole person on a project, I guess you are an architect. On a team of developers, the smartest one with the best ideas tends to become the architect. I think this actually works out well. Got ideas? Similarly, whichever developer articulates the best let them be the lead. They don’t need to be brilliant, just able to communicate to non-technical types.
Don’t even get me started on QA, deployment, and training. Who really has software testers these days? I don’t know if they exist. I’ve never actually met one. So, the role assignments are getting clarified-
Developer – assigned to the developer (obviously).
Development lead – the developer picked to attend status meetings with customers and managers.
Solutions Architect – the smartest developer (or only developer).
QA (testing) – the developers do the testing. I still propose that somebody other than the developer should officially execute the test plan.
Deployment tasks - give to the developer.
Training - that goes to the developer, too. If you’re good and thorough creating class material, you might be able to get somebody else to teach the classes.
Requirements
What about the Analyst and requirements? Well, the developer is going to build it, so who better to write the requirements than the developer? This is one of the bigger mistakes I see, having the developer author all the requirement documentation. This leads to a system that meets the requirements exactly. Unfortunately, the customer does not get what he needs. Relating customer wants and needs into requirements that developers understand, requires a talent that not many people are gifted with. Even with Agile development cycles, which is geared towards changing requirements, good requirements can reduce the number of sprints and cycles.
Subject Matter Expert
What does the subject matter expert do? He declares, “I have a dream!”
They should have the vision of what the system should do. This should relate to problems with the business that need to be solved, thus justifying the development project. In reality, the subject matter expert is the customer who explains how his business is currently so messed up, that he doesn’t know what to do. He’s got a half-baked plan and lots of presentation material that convinces somebody to fund the project. The developer assigned, get’s to know the business, tells the customer what’s wrong with their process, how he can fix it, and how long that will take. Dreams meet reality. In my experience, the SME is somebody that knows the business, processes, and problems well. This is who the analyst should be talking to, this person knows what the real requirements are.
Project Manager
Now that we’ve gone through the other roles, we’re getting to the point of this post – The Project Manager. An excerpt from PMBOK-
"Project management is the application of knowledge, skills, tools and techniques to project activities to meet project requirements. Project management is accomplished through the application and integration of the project management processes of initiating, planning, executing, monitoring and controlling, and closing. The project manager is the person responsible for accomplishing the project objectives."
This means that the project manager’s name comes after the project name and before the milestone dates on the scorecard. They are responsible for getting the project from point A to point B. In my opinion, a good PM should –
Understand all the requirements, even though they may not have written them.
Understand the system architecture and technology being used, even though they did not design it.
Understand the tasks and their dependencies. This enables them to schedule tasks appropriately.
Know where all the project documentation, issue list, and code is.
Know where the test system is and what version of the system is on it.
Be able to run and demonstrate the system.
Understand the development life cycle and know where the project currently is at in the life cycle.
Be aware of the current unknowns and holes. These are tasks that aren’t really defined or tasks that don’t have a developer available.
Understand the above items well enough to make informed decisions about the schedule and priorities of the project.
I’m sure there’s more, but the list is tall enough. A good PM is a developer’s dream. Unfortunately, the person assigned the role of PM is becoming more of a project analyst –
Reports to management and customers what’s currently being done, who’s working on what, and what the current issues and grievances are.
Reports back to the team the milestone dates that customers want and functionality they want.
So, the PM is the unlucky soul that gets yelled at by management for missing dates and yelled at by the developers for giving them impossible goals. On occasion, you have the aggressive PM who yells at the developers and management. In either case, it seems, impossible goals lead to missed dates and a fair amount of yelling.
The iron triangle of features (scope), resources, and time can be ignored, but I’ve yet to see its laws broken. Tricking or breaking the iron triangle is not the point of this discussion, so let’s not dwell on it.
What’s Happening?
The point is what happened to the good project manager? Did they all run off and hide? Are they all taking extended Project Management Institute training? My theory is that they did not evolve. Perhaps some did, but many did not. The evolution of software development and the ever increasing pressure to get more productivity from less people is squeezing the project manager position into extinction. I’m not saying the role and tasks associated with project management are disappearing, what I’m saying is the developers and other team members are now doing those tasks. Let me explain some reasons why.
The speed of software-
In the old days project managers typically came from the developer ranks. They understood the technology and how to get projects done using it. They could judge whether an architecture design was sound, if requirements made sense, how long that task would really take. Today, technology moves too fast. People that are not intimately involved with the technology being used can’t make good decisions on architecture, requirements, and tasks. Only the developers understand the technology, what can and can’t be done with it, and how long it will take. The PM fell off the learning curve. It’s really not possible for them to keep up.
Doing more with less-
Productivity in the world continues to increase. We hear of reports about the increase of goods produced by workers continuing to grow and grow. How is this possible? It’s possible with technology. Well, software is all about technology. New development tools and software are enabling developers to do more with less. Agile processes speed up the pace of development. I used to estimate that a project manager could manage no more than 2 significant projects at one time and still do a good job (reference the good PM list above). Today, project managers are assigned 5-10, or even more, projects at a given time. How do they do all that? How do they do it well? They don’t. There are new tools that help track issues, make schedules, and other management tasks. However, the people using these tools are more and more likely to be the developers, leads, and architects. This trend is not limited to project managers. Tools for testing, training, and requirements gathering are all enabling developers to do more. You could argue that these tools would also allow analysts, trainers, and testers to do more. I would agree. I would love to see that occurring. Unfortunately, I don’t.
Summary
In conclusion, the old position of project management is becoming a thing of the past. There will always be managers, customers, and developers, but managing projects is becoming a task that developers must do. Taking an excerpt from Robert’s article –
The Project Management role is the first role in the software development process that isn't on the main line. The project manager isn't a person doing "real work."
With the speed of technology and increasing productivity, a job description that does not involve main line real work, is a job position slated for extinction. So, for all you software geeks out there that got into development to avoid the paperwork, meetings, organizing tasks, and managing schedules? Sorry, your days are numbered, all of those tasks are coming home to land on your plate.
There comes a time in every IT project when things don’t go as planned. If you’re lucky, you can quickly and effortlessly get through these hurdles with proper planning and execution. In many cases though, it isn’t that simple. Your team may get caught up in a tidal wave of confusion and turmoil as you try to make sense of all the information.
I’ve been the project manager on chaotic projects, and I’ve learned that communication is the key to having better control of the situation. Here are a few steps that you can take during the project, as well as a tip for how to prevent a future project from spinning out of control.
1:1 Communication
In many cases, increasing the level communication is one of the greatest areas of opportunity for a chaotic project team.
One-on-one meetings
If possible, spend time with each team member at least once a week in an effort to keep up to date on tasks and issues. These meetings are also a time to proactively communicate any changes as they occur.
Daily/weekly team updates
I find that getting everyone on the project team together on a regular basis helps keep team dynamics and priorities aligned. When things get hectic, I like to have a 15-minute meeting every morning to regroup on what occurred the prior day; we also ensure everyone is in sync about which tasks need to be completed that day. In addition, it’s an open forum for the team to express any concerns they are feeling about the project or to reach out for help in a particular area if necessary.
Status reports
Project sponsors and the key stakeholder will likely be very interested to know what’s going on, and they’ll look to you for timely updates on your project’s progress. While it’s common to have a weekly check in during the course of the project, you may be asked for a daily update on key issues. Try coming up with a standard template they can follow that outlines any key performance indicators of the project, as well as any of the critical path items that will most likely impact your project. Daily status reports allow project sponsors and the key stakeholder to be in the loop on your progress without inundating them with all the details. These reports ensure that everyone is on the same page throughout the project.
Post mortem
When the project is finally over and you start to feel a tremendous weight being lifted off your shoulder, it’s time to regroup with the team and review what went awry. Be careful that the process doesn’t turn into a finger-pointing exercise as team members try to deflect blame. At this point, you should try to identify solutions to put in place so that future projects do not succumb to the same issues that you encountered.
Summary
When you need to manage a crisis, you also have to juggle the responsibility of keeping team members focused on the tasks at hand; if you don’t, it is amazing how hectic things can get. If you take the time to focus on these key areas of communication during your project, it will help you “right the ship” in most storms and hopefully leave you in a better position for next time.
REST is becoming the buzz word of this year. Actually you have 2 REST that I would call the Pure REST and the RESTfull way. The pure REST is the REST were the web services is resource based using the HTTP verbs (POST, GET, PUT, DETELE) to manage the resources. Parameters are in the URL path. This one is back up by JSR 311 e.g. HTTP DELETE http://www.mysite.com/service/15002/
The RESTfull way is where request are done with GET and POST and parameters are in the URL query. This one is back up by Axis or Yahoo! API.
I largely support the RESTfull way
Here are the pure REST problems:
The way we think of web services is not resource based.
There is no details on how to handle optional parameters.
There is no details on how to get the specification of the web service.
There is no details on how to assign types and contrainst to your parameters.
It not easy to tests (except for GET).
The only advantage named is the possibility to cache GET request as you know it won't change any data. I think that this argument is defining the architecture based on premature optimization.
I have read the soft coding article recently. Based on my own experience I have a sympathy to the hard coding approach. However I think the problem is not about whether soft coding or hard coding, but programmers including myself try rigidly to follow the soft coding approach believing that it will result in more flexible code, which is not true in most cases.
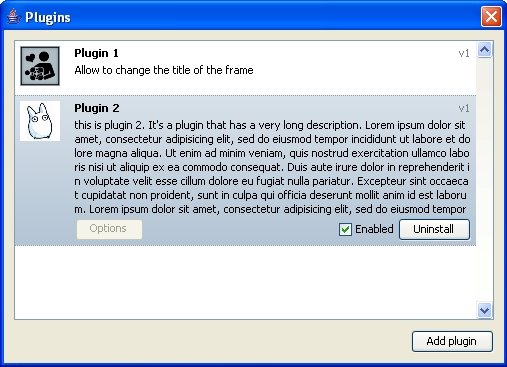
Auto update is a feature every desktop application should have ("real" users NEVER reinstall the latest version). Plugins is also a great way to enhance your application (let people code for you :) ).
There is some existing framework (Eclipse plugin, Netbean platform, Java web start (for the update) ...) which look great, but you have to learned how to use the whole platform (do I have mentioned I'm lazy ?), and you are tied to it. It was a lot more fun to code my own system :)
It's very simple to use and you should be able to have auto update AND plugins on your application with just a few lines of code. Let's look at his example :
This is a simple boring example app that just display a frame. We're going to make it a little more interesting by adding this jar to the classpath of the app.
The next thing to do is to add this lines of codes to the main method :
publicstaticvoid main(String[] args){
try{
TestProgram test =newTestProgram();
PlugEngine.getInstance().init(test);
UpdateDialog.showDialog();
PlugEngine.getInstance().startPluggables();
test.setVisible(true);
}catch(Exception e){
e.printStackTrace();
}
}
PlugEngine.getInstance().init(test) initialize the plugin engine. You can give some parameters that will be given to the plugins when they will be started. Here I give the main class as a parameter, so that the plugins have an entry point in my application, but you could add more :
Now we can write our first plugin. A plugin is an implementation of Pluggable. You can also extends Plugin, which provide some default implementations of some of the methods from Pluggable :
publicinterfacePluggable{
/**
* @return the name for this plugin, should not be null
*/
publicString getName();
/**
* @return the version for this plugin
*/
publicString getVersion();
/**
* @return the description for this plugin
*/
publicString getDescription();
/**
* @return the icon for this plugin
*/
publicBufferedImage getIcon();
/**
* @return the place where the XML descriptor for this plugin can be found, should not be null
*/
public URI getURI();
/**
* this method will be called when the main program start if this plugin is installed
* @param args arguments given by the main program
*/
publicvoid init(Object... args);
/**
* @return true if has some options to configure by the user
*/
publicboolean hasOptions();
/**
* if hasOptions() return true, this method will be called when the user
* want to edit the options from this plugin.
*/
publicvoid openOptions();
}
The plugin should also have an constructor without parameters. The init method will be called with the parameters from the main program when the plugin is launched.
Here an example which allow the user to change the title of the main frame :
Once the plugin is written it should be packaged as a JAR file.
The getURI method should return the path to a XML file on the internet which indicate where to download the JAR file, the current version and the main class of the plugin :
xml version="1.0" encoding="UTF-8"?>


<plugengine>


<plugin>


<version>v1version>


<source>file:/C:/eclipse/workspace/plug-engine test plugin/plug1.jarsource>


<class>Plugin1class>


plugin>


plugengine>
So if i made a new version of the plugin I just have to replace the Jar on my website and update the version number in this XML file (and in the java code of the plugin). The plugin will then automatically be displayed in the updates, if you have installed it on the "plugins" windows.
To install a new plugin you have to download this XML file, open the "plugins" windows, choose "Add plugin" and open the file (no need to restart the application).
Ok, now what if i want to make my application "updatable" ? Simply package it as a plugin ! The list of all the installed plugin is stored in a file "plugengine.xml" at the root of your app :
xml version="1.0" encoding="ISO-8859-1"?>
<plugengine>
<pluginenabled="true"hidden="false"update="true">
<source>plugins/plug1.jarsource>
<class>Plugin1class>
plugin>
<pluginenabled="true"hidden="false"update="true">
<source>plugins/plug2.jarsource>
<class>Plugin2class>
plugin>
plugengine>
You can manually add your application as a plugin in this file. Also set hidden to true in this file for your plugin and it will not appear in the "plugins" windows, so users will not be able to remove or disable it.
Voilà your application is now auto-updatable and support plugins !
(If your not a swing user or want to write your own updates and plugins windows, just use the methods from PlugEngine instead of UpdateDialog and PluginDialog). (I will not cover this here but it should be easy, the methods are straightforward)
Remember that this is just experimental for the moment, there is probably a lot of bugs, and I have tested it only under Windows and Java 5. Also, don't forget that the plugins don't run in a sandbox, they have full access to the system like your application. May i just reinventing the wheel here, but it was still very funny to do :)
Here is the test application from the example. Once downloaded, run it (java -classpath test.jar;plug-engine.jar test.TestProgram) and click the button to open the plugins windows. You can then download and install this plugin. It will also appear as an update each time you run the application (until you uncheck it in the update box).
You can also download the sources (from the library, the example application and the example plugin).
- drag&drop of the xml file in the plugins dialog to install
- use a version number for the main app. If the plugin is designed for a lower version, disabled it
- allow plugin to have more than one JAR file (packaged in zip file for example)
PS : it was incredibly hard to write the custom list component from the plugins and updates dialog, particularly the "extend" effect. I think I will write about this later.
I have an XML document and I want to use that document to populate a corresponding set of Java objects. This is a commonly encountered scenario when working with Java, so what is the easiest method for Java XML Binding that requires the least amount of code? You can't answer that question without first defining what "easy" is in relation to the bindings between Java and XML. To me "easy" is synonymous with "simple," so I am equating easiness to complexity. Complexity is of interest because things that are complex take longer to implement and are generally harder to maintain, based on my experiences with software in a variety of languages and platforms. Less code written means less code to maintain, and less code to write means less time is required to write that code.
JiBX - Open source project that uses binding definition documents to describe how XML is mapped to Java objects at binding runtime, where enhanced class files generated by the binding compiler build objects from an XML input document and can be outputted as XML documents (http://jibx.sourceforge.net/).
SAX/DOM/JAXP/Xerces-J - These are all types of Java XML parsers that require the manual handling of XML documents, meaning that you have to [in general] manually map the values from an XML document to the corresponding Java object (http://www.cafeconleche.org/books/xmljava/chapters/ch05.html).
SpringBeans - Uses the Inversion of Control container from the Spring Framework in order to bind values from special "bean" xml documents to Java classes. This is not useful for reading a specific XML document, but it is the binding that is of interest ; the automatic mapping of XML value to Java object field. (http://jvalentino.blogspot.com/2007/10/introduction-to-spring-framework.html).
EJB Beans - Enterprise Java Beans are a subject unto themselves, far to broad for discussion here. What is important though as with the inversion of control container from the Spring Framework, is the ability to bind values from XML documents to Java object fields (http://java.sun.com/javaee/5/docs/tutorial/doc/bnblr.html).
I have used all of these methods in depth before, but this isn't exactly what I want though:
I don't want to have to manually iterate through XML documents and manually map values.
I don't want to have to use XSD files.
I don't want to have to use libraries for binding compilers to use binding definitions to map to Java classes.
I don't want to have to modify existing XML documents so that I can use them as beans.
I know exactly what I want: I want to have a series of Java objects that are representations of nodes within an XML document, and pass the XML document to the Java object representing the root XML node and have all of the corresponding Java objects populate using that XML. I then want to be able to go from Java back to XML, and I don't want to have to do anything other then say "XML, go to Java" and then "Java, go to XML."
Why should there need to be complex mappings and external definitions when Java and XML are being used to representing the same thing?
Consider an RSS 2.0 document and what it represents:
An "rss" node has a "channel" node, a "channel" node has "item" nodes, and every node has their own properties and attributes. These relationships can then be represented in terms of objects using a class diagram (ignoring methods for getters and setters):
From this class diagram it is then possible to generate the corresponding Java classes, assuming that the class fields have the same names as their corresponding XML nodes. This can't always work though since class fields can be represented in XML as properties or attributes, so it would be necessary to designate this in Java. You may also not want to have the Java class field names the same as the XML node names, so there would need to be a way to designate this as well. One easy way to designate specific things about classes, fields, and methods is to use annotations, so consider the following 3 annotations:
@ClassXmlNodeName - used on a Java class to specify its corresponding node name in an XML document. This is required in order to designate a class as being bound to an XML document.
@XmlAttributeName - used on a Java field to specify its corresponding attribute name in an XML document. This is required in order to specify that a particular class field should be represented in XML as an attribute instead of a property.
@XmlNodeName - used on a Java field to specify its corresponding node name in an XML document. This is only required when a Java class field name is different than its corresponding XML node name.
@ClassXmlNodeName("rss")
public class Rss {
private Listchannels;
@XmlAttributeName("version")
private String version;
//getters and settings go here...
}
@ClassXmlNodeName("channel")
public class Channel {
private String title;
private String link;
private String description;
private String language;
private String pubDate;
private String lastBuildDate;
private String docs;
private String generator;
private String managingEditor;
private String webMaster;
privateintttl;
private Listitems;
//getters and settings go here...
}
@ClassXmlNodeName("item")
public class Item {
private String title;
private String link;
private String description;
private String pubDate;
private String guid;
//getters and settings go here...
}
With the exception of the annotations, these Java classes are just like any other data transfer objects (DTOs) that would be used to represent a RSS XML document. These annotations act as the mappings between Java and XML when names and types do not provide enough information. With this information, the class representing the XML document root node, and the XML document it is possible to recursively map XML nodes to Java class fields and Java class fields back to XML nodes using Reflection. So using Reflection I wrote a library that can take any Plain Old Java Object (POJO) and an XML document, and use that XML document to populate that object and all of its child objects using one line of code. The same can then be done to convert a Java object back to its XML representation using a single line of code. All of this assuming that the Java classes correspond to the XML document.
Using this "XML Binder" library the following code takes the the given instance of an Rss object and populates it and its channels and items using the given XML document:
Rss rss = new Rss();

XmlBinderFactory.newInstance().bind(rss, new File("Rss2Test.xml"));
The following code can then be used to take that same Rss object once changes have been made to it and converts it back to XML:
String xml = XmlBinderFactory.newInstance().toXML(rss);
I assert that this can work with most XML documents that have appropriate corresponding Java classes, but I have only tested it out so far with RSS 1.0, RSS 2.0, and a general test XML document in no particular format. The question now is what do I do with this library; anyone interested?
Since there seems to be some interest I have started a sourceforge.net project called "Really Easy Java XML Binding" or "RE:JAXB" since this is sort of a reply to JAXB. Here is the link
I have included POJOs for RSS 1.0 and RSS 2.0 along with unit tests to verify that the mappings from XML and to XML are working correctly. What I am looking for are ways to improve the efficiency of the to and from binding code, as well as POJOs for other common XML formats.
child objects using one line of code. The same can then be done to convert a Java object back to its XML representation using a single line of code. All of this assuming that the Java classes correspond to the XML document.
Using this "XML Binder" library the following code takes the the given instance of an Rss object and populates it and its channels and items using the given XML document:
Rss rss = new Rss();

XmlBinderFactory.newInstance().bind(rss, new File("Rss2Test.xml"));

The following code can then be used to take that same Rss object once changes  have been made to it and converts it back to XML:
String xml = XmlBinderFactory.newInstance().toXML(rss);
I assert that this can work with most XML documents that have appropriate corresponding Java classes, but I have only tested it out so far with RSS 1.0, RSS 2.0, and a general test XML document in no particular format. The question now is what do I do with this library; anyone interested?
Since there seems to be some interest I have started a sourceforge.net project called "Really Easy Java XML Binding" or "RE:JAXB" since this is sort of a reply to JAXB. Here is the link
I have included POJOs for RSS 1.0 and RSS 2.0 along with unit tests to verify that the mappings from XML and to XML are working correctly. What I am looking for are ways to improve the efficiency of the to and from binding code, as well as POJOs for other common XML formats.
Asynchronous processing is a must for many Java EE or Web-based applications -- but who has time to set up and configure JMS? In this article Di Wang shows you how to decouple your architecture so that it accommodates both synchronous and asynchronous processing. Then you can develop your business logic synchronously and plug in the JMS at runtime. The decoupled architecture enables a quicker development cycle, and also makes it easier to switch from asynchronous to synchronous processing in a deployed application.
It's a common problem in client-server applications that the server spends too much time processing data. Many of us use asynchronous processing, by way of JMS (the Java Message Service API), to get around this problem. JMS is a proven, mature technology that is supported by the Java EE specification. It's also time-consuming and complicated to work with.
Using JMS entails first setting up the JMS provider and message listener (a message-driven bean, or MDB, in many cases). In order to develop and test a JMS application from end to end you need to do the following, at minimum:
Specify the JMS provider
Define a physical queue or topic
Define a connection factory
Associate the physical queue or topic with a JMS JNDI name
Define an activation specification if using the JCA (Java Connector Architecture)
No matter what IDE or application server you use, these steps are required. While JMS is a Java EE standard, each JMS provider is a vendor-specific implementation that could require various configuration tasks. Some vendors provide scripts to expedite the setup; but learning the script itself might be a challenge. Many Java developers would agree that the JMS configuration process is tedious, error prone, and even obscure, if not exasperating.
As an alternative to using JMS you could code your business logic using POJOs and then unit test those objects. But it's often the case that meaningful test data can only be gathered if the full work flow of the application is tested. In other words, you still have to go across different layers of your Java EE architecture to create a valid request.
In this article I propose a third option -- a way to reap the benefits of asynchronous processing without the burden of configuring JMS during the development process. In the discussion that follows, I explain how to build an application that runs synchronously for most of the development process, but can then be switched to run asynchronously when you're ready to add JMS to the picture. One of the benefits of this approach is that developers are free to focus on business logic during the development cycle (as you would with a POJO-based solution) without losing the benefits of JMS.
A decoupled architecture
Imagine an application scenario where a client sends a request to a business object (BO), which in turn delegates the processing to a processor. To achieve this goal, you could decouple the BO and the processor and place between them a middle layer, called an Invoker. Instead of calling the processor directly, the BO calls the Invoker, which references the processor. In this case, the Invoker is just an interface with different implementations: synchronous and asynchronous. The introduction of the Invoker changes the workflow of the application. The architecture diagram for the sample application is shown in Figure 1, and the Invoker interface is shown in Listing 1.
Figure 1. Sample architectural diagram, showing the Invoker
Listing 1. The Invoker interface
...
/**
* The Invoker interface is used to define various invoker implementation
* strategies. An invoker can be a synchronous invoker or a JMS-based
*asynchronous invoker.
*
*/
public interface Invoker {
public void invoke(Serializable request);
}
Invoker is referenced by the business layer. As you can see in Listing 1, the interface defines only one method, which takes a serializable object as its input argument. The serializable interface is required by the MDB when the message casts to an object.
The SynchronousInvoker implementation of Invoker, shown in Listing 2, provides a synchronous architecture for the system. It references the processor directly.
Listing 2. SynchronousInvoker
...
public class SynchronousInvoker implements Invoker {
/**
* Synchronously invokes the request.
*/
public void invoke(Serializable request){
new MyProcessor().process(request);
}
}
JMSInvoker, together with the MDB, provides an asynchronous architecture for the system. This implementation of the interface is shown in Listing 3. Instead of talking to the processor directly as SynchronousInvoker does, JMSInvoker just drops the message onto a Queue or a topic, then returns control immediately.
Listing 3. JMSInvoker
...
/**
* A JMS MDB based asynchronous implementation of the invoker.
*/
public class JMSInvoker implements Invoker {
/**
* Asynchronously (JMS) invokes the specific request.
*/
private final static String ConnectionFactory = "jms/ClaimConnectionFactory";
private final static String Queue = "jms/ClaimQueue";
String error = "Error in JMS invoker: " + e.getMessage();
}
}
}
Sitting in the EJB container, ProcessMDBBean, shown in Listing 4, receives the message, casts the message to the request object, and passes it along to the processor.
Listing 4. ProcessMDBBean
...
/**
* Bean implementation class for Enterprise Bean: ProcessMDB
*/
public class ProcessMDBBean
implements
javax.ejb.MessageDrivenBean,
javax.jms.MessageListener {
...
/**
* onMessage
*/
public void onMessage(javax.jms.Message msg) {
java.io.Serializable request = null;
try {
//call the application processor
new MyProcessor().process(request);
} catch (Exception e) {
// TODO Auto-generated catch block
e.printStackTrace();
}
}
}
This is where the real business logic goes. MyProcessor, shown in Listing 5, processes the request object passed in.
Listing 5. MyProcessor
...
public class MyProcessor {
public void process(Serializable request){
//processing request here...
}
}
At the business layer, MyBO, shown in Listing 6, retrieves an Invoker instance from the InvokerFactory, shown in Listing 7, and lets the Invoker do the processing.
Listing 6. MyBO
...
public class MyBO
{
public String submitClaim(Claim myClaim){
/* Delegate call to invoker to invoke the specific request:
*
* Note: The invoker is a synchronous or asynchronous
* process based on the specific implementation used. */
InvokerFactory.getInstance().invoke(myClaim);
return myClaim.getClaimId();
}
}
Listing 7 shows the InvokerFactory.
Listing 7. InvokerFactory
...
public class InvokerFactory {
private InvokerFactory(){};
private static HashMap map = new HashMap();
private static boolean _isSynchronous = true;
public static void setSynchronous(boolean syncFlag){
_isSynchronous = syncFlag;
}
public static boolean getSynchronous(){
return _isSynchronous;
}
public static synchronized Invoker getInstance() {
The InvokerFactory loads both Invokers initially, then returns the appropriate one based on the value of isSynchronous. isSynchronous can be changed at runtime.
Deployment processes
To fully take advantage of this approach, a technical lead in your development team should take responsibility for setting the Java EE and EJB module dependencies. At the beginning of the development process, the technical lead unchecks the EJB module dependency at the EAR module, and checks in the code to source control. Once the code has been checked out from source control, the rest of the development team can focus on developing the core business logic using a synchronous architecture. A screenshot of these settings in Rational Application Developer is shown in Figure 2; obviously the equivalent is possible in any IDE.
Figure 2. Setting the dependencies
At the end of the development process, when you're ready to test the application, the technical lead can mark the EJB module dependencies for the EAR module and set up the JMS provider. Depending on the server vendors chosen, the technical lead might have to do some MDB configuration tasks as well. When the rest of the development team checks out the code from the SCM this time, they can use admin tools to switch the nature of the workflow. For instance, a JSP page like the one shown in Figure 3 would allow developers working on this application to toggle between the two invoker options.
Figure 3. AdminPage.jsp
Benefits and limitations of using the Invoker interface
While this technique can save time and trouble during the development process, it isn't suitable for every application scenario. If the application's asynchronous architecture differs too much from the synchronous version, the time saved during development might be wasted, as any asynchronous-specific features will need to be tested out in the asynchronous environment. For instance, if a feature requires that a customer asynchronously send requests and then work on other tasks while waiting for the confirmation, you cannot test this feature in the synchronous sequence.
In conclusion
Using the Invoker interface to decouple your architecture gives your application the flexibility to change from synchronous to asynchronous processing at runtime. This flexibility can help increase your development team's productivity by deferring JMS configuration and delegating it to a central resource, such as a technical lead.
You can even leverage the flexibility of the Invoker interface in a production environment. For instance, if an application's processing time is shorter than expected, users could tweak the workflow from asynchronous to synchronous processing for the sake of simplicity (so long as the application functions similarly in both scenarios). Whether you use the technique outlined here in a live application or just in a development environment, the ability to switch between synchronous and asynchronous processing should simplify your life and add flexibility to your development solutions.