10 hãng gia công phần mềm IT lớn nhất 2008

Danh sách các doanh nghiệp gia công phần mềm lớn nhất thế giới năm 2008 chứng tỏ một điều "không đổi" trong ngành CNTT toàn cầu là “tất cả luôn thay đổi”.

Mới đây, Brown-Wilson Group (Mỹ) đã lập ra bản danh sách những nhà bán lẻ, gia công phần mềm CNTT có chất lượng quản lý tốt nhất dựa trên điều tra, khảo sát ý kiến của khách hàng trên toàn thế giới. Có một điều không thể không chú ý trong Black Book of Outsourcing 2008 (tạm dịch: Sách đen về gia công phần mềm - BBO 2008) là một số “đại gia” của năm 2007 đã bị đánh bật khỏi Top 50 do tỷ lệ khách hàng quá thấp như Infosys, Hexaware, EXL Service hay ICICI Firstsource. Ngành CNTT của Ấn Độ tiếp tục có những sự bứt phá ngoạn mục khi có đến 6 doanh nghiệp của họ góp mặt trong Top 50. Danh sách BPO 2008 còn chứng minh thêm một điều rằng: lĩnh vực gia công phần mềm giờ đây không còn là “đất diễn” của những doanh nghiệp yếu về kỹ thuật hay khả năng tài chính hạn hẹp.

Dưới đây là Top 10 của năm 2008:

1. Hewlett Packard

Hewlett Packard xứng đáng được nhận danh hiệu “kẻ tiếm ngôi vĩ đại” khi vươn lên số 1 từ vị trí thứ 8 trong danh sách 2007. Ngoài ra, Hewlett Packard cũng đứng đầu danh sách 10 nhà bán lẻ gia công phần mềm kế toán và tài chính hàng đầu thế giới.

Hiện Hewlett Packard đang có mặt tại hơn 170 quốc gia. Mới đây họ đã thực hiện thương vụ mua lại nhà cung cấp dịch vụ công nghệ Electronic Data Systems Corp. (EDS) với giá 13,2 tỷ USD. Động thái này sẽ giúp cho Hewlett Packard có thêm sức mạnh để thách thức đối thủ IBM trong "sân chơi" dịch vụ công nghệ đầy lợi nhuận.

2. Perot Systems

Perot Systems Corporation là nhà cung cấp các giải pháp IT bao gồm dịch vụ hạ tầng công nghệ, dịch vụ ứng dụng, dịch vụ tư vấn… Theo điều tra của Brown-Wilson, Perot Systems nhận được sự tán dương mạnh mẽ của các khách hàng thuộc các nhóm Chính phủ, chế tạo, máy móc, y tế và bảo hiểm. Perot Systems còn được tạp chí Fortune bình chọn là doanh nghiệp đứng thứ 2 trong danh sách Các doanh nghiệp đáng khâm phục nhất của Mỹ trong lĩnh vực dịch vụ công nghệ thông tin.

3. Computer Sciences Corp

Công ty tư vấn và dịch chuyển hoạt động toàn cầu CSC chuyên cung cấp các ứng dụng, quy trình kinh doanh và giải pháp dịch chuyển hoạt động cơ sở hạ tầng IT. Với lượng khách hàng trải rộng trên 50 quốc gia và gần 90.000 lao động, CSC cũng đứng đầu danh sách các doanh nghiệp có sự hồi phục mạnh mẽ nhất trong 5 năm (2004-2008).

CSC mới đây đã ký một hợp đồng gia công IT với nhà sản xuất máy bay Hawker Beechcraft Corp.

4. Unisys

Công ty Unisys Corp (Mỹ) kết hợp chuyên môn về hoạt động tư vấn, hợp nhất hệ thống, gia công, cơ sở hạ tầng và công nghệ máy chủ. Unisys, hoạt động trong lĩnh vực kinh doanh phần cứng cũng như các máy chủ doanh nghiệp chế tạo, dự định xây dựng một phòng thí nghiệm phần mềm ở Mexico với số vốn đầu tư 50 tỷ USD trong 3 năm tới.

5. EDS

Electronic Data Systems Corp (tên viết tắt là EDS) ra đời từ năm 1962 với số vốn ban đầu chỉ là 1.000 USD nhưng hiện nay tổng tài sản của họ đã lên đến 20 tỷ USD. Tuy vậy, năm 2008 không được coi là năm thành công của họ khi “rớt hạng” từ vị trí số 1 trong danh sách BBO 2007 xuống vị trí thứ 5 như hiện nay. Dự kiến, EDS sẽ giúp HP tăng cường sự hiện diện trong các dịch vụ công nghệ bao gồm điều hành các trung tâm máy tinh dữ liệu, kết hợp các chương trình phần mềm và tư vấn các dự án đặc biệt cho khách hàng doanh nghiệp và chính phủ.

6. Wipro

Đây là lần đầu tiên Wipro xuất hiện trong BBO 2008 trong khi "kình địch" của họ là Infosys đã rơi khỏi Top 10. Theo Brown-Wilson Group, chiến lược gia công đảo ngược của Wipro ở các thị trường Mỹ và Anh đã giúp hãng trở thành một công ty được ưa thích của các khách hàng Mỹ. Wipro cung cung cấp dịch vụ gia công IT trong các lĩnh vực ngân hàng và thị trường vốn, bảo hiểm, lữ hành và chế tạo sản phẩm công nghệ cao, viễn thông, y tế, tài chính và kế toán... Nghiên cứu trên dự đoán nhu cầu chuyển giao hoạt động kinh doanh của các khách hàng sẽ đưa Wipro tới một thành công lớn trong năm 2009.

7. Satyam

Bên cạnh vị trí thứ 7 trong danh sách BPO 2008, Satyam cũng giữ vị trí thứ 4 trong danh sách 10 nhà bán lẻ gia công kiến thức (KPO) hàng đầu thế giới. Trong quý I/08, Satyam đã thông báo một mức tăng 18,5% khi mà sự suy giảm ở thị trường Mỹ thu hút các thỏa thuận gia công. Tuy vậy, Satyam đang tích cực thúc đẩy khoảng 20 thỏa thuận lớn có giá trị 50-100 triệu USD/vụ để đánh bại xu hướng suy giảm.

8. Genpact

Genpact hoạt động trong lĩnh vực quản lý các quy trình kinh doanh cho các doanh nghiệp trên toàn cầu. Với hơn 19.000 lao động và hoạt động trải dài tại 9 quốc gia, tốc độ tăng trưởng của Genpact được dự báo là sẽ tăng khoảng 30-35% trong năm tới.

9. Automatic Data Processing (ADP)

ADP chuyên cung cấp các giải pháp dịch chuyển hoạt động kinh doanh. Doanh thu năm 2008 của họ là gần 8 tỷ USD. ADP cũng là nhà cung cấp hàng đầu thế giới về các giải pháp máy tính hợp nhất cho các doanh nghiệp kinh doanh ô tô, xe tải nặng, xe máy, các phương tiện giải trí và hàng hải trên toàn cầu. Theo nghiên cứu trên, các mô hình HR chú trọng khách hàng xây dựng các bảng lương và dịch vụ do lợi ích dẫn đầu đang thịnh hành và giúp ADP giành được chỗ đứng trong tốp 10 nói trên.

10. Ciber

Ciber là một công ty tư vấn hợp nhất hệ thống quốc tế. Thu nhập hàng năm của họ xấp xỉ 1,2 tỷ USD, Ciber cho biết doanh thu của hãng trong quý I/08 đã đạt 294,5 triệu USD. Ciber, cung cấp cơ sở nhân lực chiến lược, ở cả môi trường cả gói kế hoạch tài nguyên doanh nghiệp và hải quan (ERP), mới đây đã mua lại hai nhà cung cấp dịch vụ SAP ở Thụy Điển và Mỹ.

10 công cụ miễn phí tốt nhất cho .NET

Không thể có ứng dụng tốt nếu không có công cụ phát triển tốt, dù là phát triển với bất kỳ ngôn ngữ (lập trình) nào, ngay cả với các ngôn ngữ 'mạnh' của nền tảng .NET hiện đang 'nổi đình nổi đám'. Ngoài công cụ phát triển ứng dụng 'chính thống' và 'đồ sộ' như Visual Studio .NET (VS.NET) của Microsoft, cộng đồng phát triển .NET hiện nay có thêm nhiều lựa chọn với các công cụ gọn nhẹ hơn và đặc biệt là có mã nguồn mở hay miễn phí.

Bài viết này giới thiệu 10 công cụ miễn phí tốt nhất dành cho các nhà phát triển .NET, trong số đó có những công cụ giúp phát triển ứng dụng nhanh hơn và có những công cụ có thể làm thay đổi hẳn cách thức bạn viết mã lệnh (code).

SNIPPET COMPILER

Snippet Compiler (http://www.sliver.com/dotnet/SnippetCompiler) là công cụ dùng để viết code, biên dịch và chạy, nó đặc biệt có ích đối với những đoạn code nhỏ (khi bạn không muốn tạo toàn bộ project VS.NET cùng với các tập tin đi kèm).

Ví dụ, đoạn code dưới đây gọi chạy một ứng dụng khác (Notepad) từ .NET. Bạn có thể thực thi (chạy) đoạn code này ngay trong Snippet Compiler (chỉ việc nhấn nút Play).

using System;

using System.Collections;

public class MyClass {

public static void Main() {

System.Diagnostics.Process proc = new System.Diagnostics.Process();

proc.StartInfo.FileName= 'notepad.exe';

proc.Start();

proc.WaitForExit();

}

}

REGULATOR

Regulator (http://royo.is-a-geek.com/regulator) là công cụ hoàn chỉnh dùng để biên dịch và kiểm tra biểu thức chuỗi, đây là vấn đề hiện được quan tâm vì được ứng dụng nhiều trong .NET. Biểu thức chuỗi được dùng để định nghĩa các chuỗi ký tự và số, thường được dùng để so trùng dữ liệu người dùng nhập vào hay để tìm chuỗi ký tự trong một chuỗi lớn hơn.

Regulator cho phép bạn nhập vào một biểu thức chuỗi và dữ liệu đầu vào để kiểm tra. Bằng cách này bạn có thể thấy cách thức làm việc của biểu thức và kết quả trả về trước khi thực hiện trong ứng dụng.

Một trong những đặc tính hấp dẫn nhất của Regulator là khả năng tìm thư viện biểu thức trực tuyến ở regexlib.com. Ví dụ, nếu nhập vào chuỗi 'phone' trong ô tìm kiếm, bạn sẽ tìm thấy hơn 20 biểu thức khác nhau so khớp số điện thoại, bao gồm các biểu thức áp dụng cho số điện thoại ở Anh, Úc...

CODESMITH

CodeSmith (http://ericjsmith.net/codesmith) là công cụ sinh mã dựa trên template (mẫu có sẵn) dùng cú pháp tương tự như ASP.NET để sinh ra dạng code hay text bất kỳ, từ tập hàm đơn giản đến toàn bộ ứng dụng. Không giống như nhiều công cụ sinh mã khác, CodeSmith không yêu cầu bạn mô tả thiết kế hay kiến trúc ứng dụng.

Khi xây dựng ứng dụng, bạn nhận thấy thường phải lặp đi lặp lại một số công việc, ví dụ như viết code truy cập dữ liệu hay xây dựng hàm. CodeSmith đặc biệt hữu dụng trong những tình huống như vậy, vì nó cho phép bạn tạo các template để thực hiện tự động các công việc này, không chỉ cải thiện hiệu suất làm việc mà còn tránh cho bạn sự nhàm chán.

CodeSmith có sẵn một số template, bao gồm các kiểu tập hợp .NET cũng như thủ tục, nhưng sức mạnh thực sự của công cụ này chính là khả năng tạo template riêng.

Template của CodeSmith là tập tin văn bản đơn thuần và bạn có thể tạo bằng công cụ soạn thảo văn bản bất kỳ, chỉ với yêu cầu là lưu lại với đuôi .cst. Đầu tiên, bạn tạo phần đầu khai báo ngôn ngữ dùng cho template, ngôn ngữ kết quả và mô tả vắn tắt template.

<%@ CodeTemplate Language='C#'
TargetLanguage='C#'
Description='Car Template' %>

Phần kế tiếp của template khai báo các thuộc tính sẽ được xác định khi template chạy. Ví dụ dưới đây khai báo một thuộc tính chuỗi (string).

<%@ Property Name='ClassName' Type='String' Category='Context'
Description='Class Name' %>

Bước tiếp theo xây dựng phần thân template với mã lệnh tương tự ASP.NET, bạn có thể dùng bất kỳ lệnh .NET nào.

CodeSmith khá dễ dùng và có thể cho ra những kết quả tuyệt vời nếu được sử dụng đúng đắn. Một trong những phần phổ biến nhất của ứng dụng thích hợp cho việc sinh mã là truy cập dữ liệu. CodeSmith có tích hợp thành phần đặc biệt gọi là SchemaExplorer có thể dùng để sinh các template cho bảng dữ liệu (table), thủ tục lưu trữ (stored procedure) và gần như bất kỳ đối tượng SQL Server.

NUNIT

NUnit (hhtp://www.nunit.org) là khung kiểm tra đơn vị chương trình (như lớp, hàm hay module) có mã nguồn mở. Được phát triển theo mô hình JUnit (công cụ kiểm tra nổi tiếng dùng cho Java), nhưng NUnit được viết bằng C# và khai thác được ưu điểm của các ngôn ngữ .NET.

NUnit cho phép bạn viết hàm kiểm tra lỗi (unit test) theo ngôn ngữ lựa chọn để kiểm tra một chức năng cụ thể của chương trình. Unit test là cách thức tốt để kiểm tra hoạt động của đoạn code viết mới, và cũng là một phương thức kiểm tra hồi quy ứng dụng. Các unit test có thể lưu lại và chạy lại mỗi khi bạn sửa đổi code, điều này giúp phát hiện lỗi dễ dàng hơn và đảm bảo phát triển ứng dụng tốt hơn.

NUnit cung cấp khung để viết các unit test, và còn có giao diện đồ họa để chạy các unit test và xem kết quả. Ví dụ, chúng ta sẽ kiểm tra hoạt động của lớp Hashtable trong .NET với việc thêm vào và lấy ra 2 đối tượng. Bước đầu tiên là tham chiếu đến NUnit.Framework để có thể dùng các thuộc tính và hàm của NUnit; kế tiếp, tạo một lớp và đánh dấu nó với thuộc tính [TestFixture] để NUnit biết lớp này có hàm kiểm tra.

using System;

using System.Collections;

using NUnit.Framework;

namespace NunitExample {

[TestFixture]

public class HashtableTest {

public HashtableTest() { }

}

}
Kế tiếp, chúng ta tạo một hàm và đánh dấu với thuộc tính [Test] để NUnit biết đây là hàm kiểm tra. Trong hàm này chúng ta sẽ thiết lập Hashtable và đưa vào 2 giá trị, sau đó dùng hàm Assert.AreEqual để truy xuất 2 giá trị này.

[Test]

public void HashtableAddTest(){

Hashtable ht = new Hashtable();

ht.Add('Key1', 'Value1');

ht.Add('Key2', 'Value2');

Assert.AreEqual('Value1', ht['Key1'], 'Wrong object returned!');

Assert.AreEqual('Value2', ht['Key2'], 'Wrong object returned!');

}

Để chạy thủ tục kiểm tra, bạn cần xây dựng project, mở nó trong NUnit và nhấn nút Run. Bạn cũng có thể tải về NUnit Visual Studio .NET add-in (http://sourceforge.net/project/nunitaddin) để chạy kiểm tra trực tiếp trong Visual Studio.

FXCOP

FxCop (http://www.gotdotnet.com/team/fxcop) là công cụ kiểm tra gói chương trình đảm bảo tính tương thích với những quy tắc của .NET Framework (http://msdn.microsoft.com/library/default.asp?url=/library/en-
us/cpgenref/html/cpconnetframeworkdesignguidelines.asp): Thiết kế thư viện, vấn đề bản địa, quy cách đặt tên, hiệu suất, bảo mật. FxCop do Microsoft phát triển và kèm theo tập các quy tắc do Mircosoft đưa ra, tuy nhiên bạn có thể tạo thêm những quy tắc riêng.

Ví dụ, chúng ta hãy xem FxCop kiểm tra và phát hiện lỗi trong gói NUnitExample ở trên. Trước hết, bạn cần tạo một project FxCop và đưa vào gói mà bạn muốn kiểm tra, sau đó nhấn Analyze và FxCop sẽ kiểm tra và đưa ra thông báo lỗi (Hình 3).

FxCop có thể giúp bạn viết code tốt hơn nhưng nó không thể sửa chữa thiết kế tồi hay lập trình kém. FxCop cũng không thể thay thế việc kiểm tra code nhưng nó cho phép bạn dành nhiều thời gian hơn cho những vấn đề quan trọng hơn là quy ước đặt tên.

.NET REFLECTOR

.NET Reflector (http://aisto.com/roeder/dotnet) là công cụ 'dịch ngược' (decompiler) và duyệt danh sách lớp, có thể giúp bạn khám phá tất cả 'bí mật' bên trong một gói. .NET Framework đưa ra reflection dùng để xem code .NET bất kỳ, dù là lớp đơn hay toàn bộ gói chương trình ('reflection' là tính năng cho phép ứng dụng truy vấn siêu dữ liệu của chính nó). Reflection cũng có thể dùng để truy xuất thông tin từ các lớp, hàm và thuộc tính khác nhau trong một gói nào đó. .NET Reflector cho phép bạn duyệt danh sách các lớp và hàm trong một gói, bạn có thể xem xét ngôn ngữ trung gian của Microsoft (MSIL) được sinh ra từ các lớp và hàm này, và có thể dịch ngược các lớp và hàm sang C# hay VB.NET.

Ví dụ, chúng ta dùng .NET Reflector xem xét gói NUnitExample ở trên, hình 4 thể hiện gói này khi được nạp. Để xem MSIL của một hàm, bạn nhấn chọn hàm và chọn menu Disassembler, hay chọn menu Decompiler để xem ở dạng ngôn ngữ C#. Bạn cũng có thể dịch ngược hàm sang VB.NET hay Delphi bằng cách thay đổi tùy chọn trong menu Language.

.NET Reflector đặc biệt có ích để tìm hiểu các hàm và gói trong .NET Framework. Ví dụ, dùng .NET Reflector bạn có thể biết được cách thức mà Microsoft dùng với hàm ReadXml. .NET Reflector cũng rất có ích để tìm hiểu cách thức tạo các đối tượng như HttpHandlers, và qua đó biết được cách thức mà nhóm phát triển của Microsoft đã xây dựng các đối tượng trong Framework.

NDOC

Việc lập tài liệu chương trình luôn là công việc khó gây hứng thú. Ở đây không nói về tài liệu thiết kế mà là tài liệu hàm và thuộc tính của lớp. Công cụ NDoc (http://ndoc.sourceforge.net) sẽ tự động sinh tài liệu cho chương trình của bạn bằng cách dùng reflection để truy vấn thư viện và dùng XML được sinh từ chú thích XML C#. Chú thích XML chỉ có hiệu lực cho C#, tuy nhiên công cụ VB.DOC (http://vb-doc.sourceforge.net) và VBCommenter của VS.NET Power Toy có thể thực hiện tương tự cho VB.NET. Ngoài ra, phiên bản kế tiếp của Visual Studio sẽ hỗ trợ nhiều ngôn ngữ hơn.

Đầu tiên, bạn dùng NDoc để sinh chú thích XML cho gói chương trình. Nhấn phải project và chọn Properties.Configuration Properties.Build, sau đó nhập vào đường dẫn nơi lưu tập tin XML trong tùy chọn XML Documentation File. Dưới đây là tài liệu của hàm trong ví dụ NUnit.

///


/// This test adds a number of values to the Hashtable collection

/// and then retrieves those values and checks if they match.

///


[Test]

public void HashtableAddTest(){

//Method Body Here

}

Tài liệu XML của hàm này sẽ được trích xuất ra và lưu lại trong tập tin XML.


This test adds a number of values to the Hashtable collection
and then retrieves those values and checks if they match.


Sau khi sinh ra tập tin XML, bước kế tiếp nạp gói chương trình và tập tin XML vào NDoc để xử lý. Việc này được thực hiện đơn giản bằng cách mở NDoc và nhấn nút Add. Sau khi khai báo thuộc tính đầu ra, nhấn nút Generate để bắt đầu quá trình sinh tài liệu.

NANT

NAnt (http://nant.sourceforge.net), phiên bản .NET của Ant được hỗ trợ với dự án Jakarta (khá phổ tiếng trong cộng đồng phát triển Java), là công cụ cho phép dễ dàng tạo qui trình build (biên dịch và tích hợp ứng dụng) dựa trên XML. Khi có nhiều nhà phát triển cùng làm việc trên một dự án, bạn không thể phó thác việc build cho từng người, và chắc bạn cũng không muốn thực hiện build thủ công nhiều lần mỗi ngày. NAnt cho phép bạn build tự động toàn bộ ứng dụng, chép các tập tin, chạy các kiểm tra NUnit, gửi email và nhiều chức năng khác. NAnt dùng các tập tin XML để khai báo những tác vụ cần thực hiện trong quá trình build. Lưu ý là MSBuild, thành phần trong phiên bản mới Visual Studio 2005, có tính năng tương tự và có thể thay thế NAnt.

Ví dụ dưới đây là tập tin XML (có phần đuôi là .build) để biên dịch ứng dụng NUnitExample với NAnt.


The NUnit Example Project


debug='${debug}'>


Tập tin XML này được lưu ở thư mục gốc của project NUnitExample. Bạn đến thư mục này và chạy nant.exe để biên dịch ứng dụng.

Tuy không dễ dàng như việc nhấn Build trong Visual Studio, nhưng NAnt là công cụ rất mạnh dùng để xây dựng qui trình build chạy tự động theo lịch biểu.

Công cụ chuyển đổi

Cuối cùng là 2 công cụ đơn giản nhưng rất hữu dụng. Đầu tiên là ASP.NET Version Switcher (http://www.denisbauer.com/NETTools/ASPNETVersionSwitcher.aspx), công cụ này dùng để chuyển đổi phiên bản (version) ASP.NET của một website đang hoạt động. Công cụ thứ hai là Visual Studio Converter (http://www.codeproject.com/macro/vsconvert.asp) dùng để chuyển đổi tập tin project từ VS.NET 2002 sang VS.NET 2003 hay ngược lại.

IIS sử dụng cơ chế ánh xạ phần mở rộng (extension) để xử lý yêu cầu một website. Khi cài ASP.NET 1.1, cơ chế này được nâng cấp phiên bản mới và gây lỗi khi chạy ứng dụng được xây dựng trên ASP.NET 1.0. Để giải quyết vấn đề này, bạn có thể chuyển tất cả ánh xạ phần mở rộng của website về phiên bản 1.0, tuy nhiên, thực hiện thủ công việc này rất vất vả và đây chính là nơi 'dụng võ' của ASP.NET Version Switcher. Tiện ích nhỏ này có thể dùng để chuyển version .NET của bất kỳ ứng dụng ASP.NET nào. Công cụ này càng có ích khi tương lai có thêm các phiên bản mới ASP.NET và .NET Framework.

Visual Studio Converter tương tự như ASP.NET Version Switcher, ngoại trừ việc nó được dùng để chuyển đổi version của tập tin project Visual Studio. Mặc dù chỉ có một ít khác biệt giữa .NET Framework version 1.0 và 1.1, một khi tập tin project được chuyển từ VS.NET 2002 sang VS.NET 2003 thì không thể chuyển ngược lại. Tuy nhiên, đôi khi việc chuyển ngược lại cần thiết. Công cụ Converter này cho phép chuyển bất kỳ tập tin solution hay project từ Visual Studio 7.1 (VS.NET 2003) về Visual Studio 7.0 (VS.NET 2002) và ngược lại.

Structuring Solutions in Visual Studio and Team Foundation

Believe it or not, engineers or developers tend to structure their applications in Visual Studio various ways. For those that are just learning .Net and Visual Studio it is hard to decide where to put things. Hopefully this article will provide some guidance.

Where did I put that file?

So you've decided that you want to write an application in .Net. For learning purposes you start adding controls or pages to your application and you are well on your way to making a somewhat usable app. After awhile you start to notice your solution becomes a cluttered mess with files and folders and it becomes hard to remember where you put things. This can be considered both good and bad. You get complete flexibility in one hand and utter chaos in another. Those that are used to other frameworks like Rails or LogiCreate understand you put this here, that here, that there, and this over there named this way or things don't work. In .Net it is so flexible when starting a project it is hard to get a good sense of where you *should* put things.

If you downloaded 10 projects from http://www.codeplex.com or http://www.sf.net you'll find 10 different ways of how things are organized. Flexibility is great, but when you are trying to organize your development teams to develop applications so team members can move from project to another this isn't good. Consistency is the key to productivity. There is guidance on how to structure solutions and projects from the Patterns and Practice team but it is dated I think and doesn't go the extra deep dive to explain really where / how to structure things. Here are some base line tips to get you thinking about how to organize your projects.

Tip #1: Change Default Options

When you first install Visual Studio, the first thing I do is turn on the feature to always show the solution. I'm not really sure of the reasoning why this is even turned off but you'll find this settings in the Tools menu:

When this is enabled you'll be able to easily access menus for adding your solution to source control, configuring certain projects to build or not build depending on your needs and another option that is very useful which is Clean Solution. With the solution shown in the projects window here is a snap of that menu when you right click:

Tip #2: Solutions are Deployable Entities

I can't really stress this enough but to me it is just common sense, yet I see solutions all the time that are made up of multiple projects which are deployed separately. I never mix solutions which have separate deployable projects. For example, if I am building a Smart Client application, the web services used for the Smart Client application will reside in another solution. They may, and can share some of the same common libraries but it doesn't matter. If I want to work on a web service because I'm changing the business rules or adding a new method, I don't want to look at everything else, just the items I need.

When you leverage the build feature in Team System, this starts to make more sense since you specify a solution to build. Combine automated builds with automatic push utilities and you start to see where I am headed. The other reason I think of solutions as deployable entities is because different teams or team members may work on various portions. Having separation is good because various teams can work on separate modules and backend services and not have to worry with conflicting solution files in Team System which are hard to resolve.

Tip #3: Folder Structure

This tip is probably the most talked about topic when I speak at various events. Everyone is curious about where or how to name certain things. This is also something I devoted a large amount of time to several years ago to figure out what works and doesn't work. I understand that what I suggest may not work for every scenario out there, but it does work and has proven itself to be very easy to manage. Even for developers moving from project to project to understand.

Here is a screen shot of a slide that I recently added to one of my presentations which shows how I structure applications on the file system.

On the file system we have a folder called "EnterpriseDesktop". This is our folder where the source files will be checked out from Team System. This could be c:\development\EnterpriseDesktop or d:\teamsystem\EnterpriseDesktop depending on where you want to put things. Under this folder we have all the files that belong to our project. The first thing you should notice is everything resides under a folder called "Source". This is intentional because it allows us take advantage of a feature in Team System easily called "Branching".

Since our entire application resides in the Source folder, we can easily branch this folder into a future release with new features, ongoing bugs, or multiple branches which would allow us to then merge it back into the main trunk later on. For more information on branching in Team Foundation see this article on Branching and Merging Team Foundation Source Control.

Modules
Underneath the Source folder we see a module called Help Desk outlined. In larger applications, it is easy to break down the application into modules. No matter if your application is a web application, you can still think in terms of modules. Very simply, just think of your features and break down your features into different modules. In some cases you may find this doesn't work and that is fine. Normally on smaller applications it doesn't make sense, but if you are building larger ones, it does. Even if you have a smaller application you still can choose to build out an N-Tier architecture with your project in which case this theory still applies.

Tip #4: Modules Are Made Up Of Projects

Modules are simply a collection of sub projects. If we look at just a module as outlined below we see the module is made up of several layers:

  • UI
  • Data access
  • Business
  • Workflow
  • etc...

For each layer we create a folder on the file system. In this folder we create our project. Each project folder is green above. Taking this approach aligns our projects according to the namespace we desire since the namespace is derived from the folder hierarchy. Taking this approach means you don't have to remember to change the namespace setting manually in Visual Studio and since the folder structure inherits or outlines our desired namespace it is easy to understand.

For example let's say I have a Windows application called EnterpriseDesktop and I want to add a Business layer which holds my business rules. Simply by the way I create the project determines the Namespace of this and the location.

Why did I call the name of the new project I was adding "EnterpriseDesktop.HelpDesk.BusinessLayer"? The reason is because if you look at the folder structure outlined, that is essentially my folder structure and my Namespace. The Name field translates into a Folder. After pressing the OK button your folder structure will look like this:

This makes it incredibly easy for developers to understand where files are located, what the Namespaces are etc. For those that revel in Namespaces, it becomes apparent where / how you place things. If you decide to create a namespace like System.Data.SqlClient it becomes apparent where those files are located in the hierarchy if you want to reference just the project for a given namespace.

Question? Why the redundancy in folder names? Wouldn't I just put the project in the EnterpriseDesktop->Source->HelpDesk->BusinessLayer folder?

Answer: No! The reason is this. What if you decide later on to sub-namespace the business layer or any other one for that matter? You have no place to go then with the pattern. By keeping things separate we don't run into this problem.

Tip #5: Where do the solution files go?

Since you need to branch the entire source control, the solutions need to go in the root of the Source folder. It is ok to have several solutions if you have different deployable entities. Remember, solutions are for deployable entities. In the case of a web application this might be a console application, windows service, web service or a backend web solution. I typically use this standard for solution files:

ProjectName.DeployableName.Master.sln

In the case of EnterpriseDesktop where we have a user interface and a help desk module, I would have the following solutions in the Source's root folder:

  • EnterpriseDesktop.WinForm.Master.sln
  • EnterpriseDesktop.HelpDesk.WebService.Master.sln

Tip #6: Where do I put Third Party Assemblies?

Most applications you build are going to leverage third party assemblies. Either those you download for free or those you may purchase. In the root folder of your source tree, create a folder called ThirdPartyAssemblies. In this folder, nest each of the third party utilities your application leverages.

While this may sound like common sense, I've seen projects in Team System or other source control systems which leverage ThirdPartyAssemblies from totally different projects, or even worse, require the developer to install a certain package onto their machine like Enterprise Library. When you checkout your application from source control, you should be able to build right then and there. No additional downloads, installs, or updates from other projects.

If you don't include your own version of your own assemblies in your source control tree you are looking for trouble. It also complicates ease of use, as well as complicates automating builds. I've even seen situations where a developer referenced a third party DLL from another project that was in a totally different source tree and didn't know why their application broke all of a sudden. The reason was that a newer version of a DLL was replaced that broke their app. Here is a screen shot to outline how I structure this on the file system.

Question? Will this work from machine to machine?
Answer: Yes! The reason is when you add a reference to an assembly in ThirdPartyAssemblies, the solution doesn't hard code the path, but rather uses a relative path like this: ../../../../ThirdPartyAssemblies/EnterpriseLibrary/RunTime/Microsoft.XXX.XXXX.DLL. This ensures everyone gets the same version of each assembly no matter if they use a C: or a D: or where they place the source code on the file system.

Conclusion

There you have it, the howto guide on setting up your application with Team System and Visual Studio. I understand that not everyone does the same thing the same way, but there is a lot to be gained if we all agreed on a standard. Obviously other projects have agreed and look at what it has done for them. Case in point would be Ruby on Rails.

In the .Net space we do have something on the horizon which may assist us in getting closer to a standard similar to Ruby on Rails but right now it is too early to tell. What I am referring to is the "Guidance Automation Toolkit". Several Software Factories are currently using this to guide developers on where to place things but it would be nice to see this expanded and become a major feature. The idea behind the toolkit is architects or other developers could create guidance packages which force developers to code in their standard. In other words, if I told Visual Studio that I wanted to create an Enterprise Web Application or Smart Client, decisions would already be made on where UserControls, Forms, Web Services, Documentation and more have to reside in order for my application to function. Today, we see a glimpse of this when using the Smart Client Software Factory or the Web Service Software Factory. I would like to see it expanded though, there is a lot to gain from having standards, not just in code, but structure.

Reference: keithelder.net

Using NUnit with VB.NET

Instructions for installing nUnit with VB.NET

1. To start with you need to download nUnit. Once you have downloaded it install it using the default options; doing this really is the easiest option.

2. Start Visual Studio 2005 (this will work with VB.NET Express also, in exactly the same way).

3. Create a simple default WindowsApplication1 project consisting of a simple form: File|New Project, VisualBasic | Windows, WindowsApplication, OK. Compile and run using Ctrl-F5 and watch an empty form appear. Close it. Save the project (File|Save).

4. I recommend that you do Project|Show All Files. This will make the references appear in the solution explorer, which helps you see what you're doing.

5. Add a reference to nUnit to the project. In the 'Solutions Explorer' on the right hand side of the screen, right-click on WindowsApplication1, choose Add Reference. A dialog box will appear with several tabs; in the .NET tab, click on nunit.framework so that it is selected and click OK. The reference will appear in the Solutions Explorer.

6. Now add two classes in the usual way (in the 'Solutions Explorer' on the right hand side of the screen, right-click on WindowsApplication1, choose Add|Class. The two classes are AppSettings.vb and AppSettingsTests.vb. Paste the following code into each:

Imports NUnit.Framework

_
Public Class AppSettingTests

Private mAppSetting As AppSetting
Private idval As String = "test234567"
Private nameval As String = "test"

_
Public Sub SetUp()
mAppSetting = New AppSetting(idval, nameval)
End Sub

_
Public Sub TearDown()

'nothing to do here
End Sub

_
Public Sub id()
Assert.AreSame(mAppSetting.id, idval, "ID value loaded was " & mAppSetting.id & " and not the expected value of : " & idval)
End Sub

_
Public Sub name()
Assert.AreSame(mAppSetting.name, nameval)
End Sub
End Class

and

Public Class AppSetting
Private displayName As String
Private settingID As String
Public Sub New(ByVal id As String, ByVal name As String)
displayName = name
settingID = id
End Sub
ReadOnly Property name() As String
Get
Return displayName
End Get
End Property
ReadOnly Property id() As String
Get
Return settingID
End Get
End Property
Public Overrides Function ToString() As String
Return displayName
End Function
End Class

7. Rebuild the exe with Ctrl-F5, check it still runs.

8. Now open a command line (Start|Run|cmd, enter), and cd to the bin directory in which that was compiled (in my case it was C:\myvbnet\WindowsApplication1\WindowsApplication1\bin\Release, but if you are running in debug mode it will be C:\myvbnet\WindowsApplication1\WindowsApplication1\bin\Debug). Do a dir and you should see something like this:

C:\myvbnet\WindowsApplication1\WindowsApplication1\bin\Release>dir
Volume in drive C has no label.
Volume Serial Number is 5472-A68F

Directory of C:\myvbnet\WindowsApplication1\WindowsApplication1\bin\Release

24/03/2007 11:25 .
24/03/2007 11:25 ..
16/03/2007 15:06 69,632 nunit.framework.dll
16/03/2007 15:06 279,779 nunit.framework.xml
24/03/2007 11:23 1,318 TestResult.xml
24/03/2007 11:19 1,463 TestTesult.xml
24/03/2007 11:25 28,672 WindowsApplication1.exe
24/03/2007 11:25 69,120 WindowsApplication1.pdb
24/03/2007 11:25 127 WindowsApplication1.xml
7 File(s) 450,111 bytes
2 Dir(s) 7,981,608,960 bytes free

C:\myvbnet\WindowsApplication1\WindowsApplication1\bin\Release>

By now this directory should contain not only your WindowsApplication1.exe but also nunit.framework.xml and nunit.framework.dll, copied there when you added the reference to them in VS. If these are not found you've probably forgotten to add the reference above.

9. Now double-click on the NUnit icon on your desktop to run the NUnit IDE. Do File|Open Project and navigate to the bin/release directory above. Click on the WindowsApplication1.exe. This should open, and display some tests:

10. Click on the Run button to run the tests. If this doesn't work, it's probably because (a) you forgot to recompile (b) you didn't include the reference so the .dll isn't there.

11. Now we can see that NUnit is working, we now check the command line version. Go back to your cmd window and run the following:

"C:\Program Files\NUnit 2.4\bin\nunit-console.exe" WindowsApplication1.exe

Something like this should happen:

C:\myvbnet\WindowsApplication1\WindowsApplication1\bin\Release>"C:\Program Files\NUnit 2.4\bin\nunit-console.exe" WindowsApplication1.exe
NUnit version 2.4.0
Copyright (C) 2002-2007 Charlie Poole.
Copyright (C) 2002-2004 James W. Newkirk, Michael C. Two, Alexei A. Vorontsov.
Copyright (C) 2000-2002 Philip Craig.
All Rights Reserved.

Runtime Environment -
OS Version: Microsoft Windows NT 5.1.2600 Service Pack 2
CLR Version: 2.0.50727.42 ( Net 2.0.50727.42 )

..
Tests run: 2, Failures: 0, Not run: 0, Time: 0.320 seconds


C:\myvbnet\WindowsApplication1\WindowsApplication1\bin\Release>

The command line tool is what you use from within VS.NET, which is why we check all this. If you get "Tests run: 0" you have again got something wrong; you probably are running the .exe from the .obj folder somehow.

12. Now return to VB.NET. You need to add a menu entry to run the command-line utility. Add this to the Tools menu as follows.

Open the "tools" menu and select the external tools option. This will pop up a small dialog box that lets you add/edit custom tools. By default in my version of VS 2005 one custom tool already existed (Dotfuscator) so I needed to add a new one. To do so you just click on the "Add" button.

Title:

nUnit
This can be anything.

Command:
C:\Program Files\NUnit-2.4\bin\nunit-console.exe
I used the browse button to find nunit-console.exe, if you installed in the default place it should be what I entered
Arguments
$(TargetName).exe
$(TargetPath) will NOT work.
Initial Directory
$(ProjectDir)/bin/release
$(TargetDir) will NOT work -- it tends to point to the obj directory

Since this setup is using the console option I also checked the "Use Output Window" checkbox.

For the "command" option you can also use the nunit-gui.exe if you want to see a nice graphical representation of test success/failure or just want to run certain tests; for the remainder of this article I will be referencing the console version but the gui version works just as well.

Once done entering my custom tool settings I hit the "OK" button.

This is where a lot of problems can occur. I am presuming that you are compiling to bin/release and that this is where your nunit.framework.dll and nunit.framework.xml are (do a search on the folder and find out). I have found that you cannot use $(TargetPath) since the blessed thing points to the obj/release folder rather than the bin/releasec:\echo.cmd text file containing only one line: folder. I diagnosed this by creating a simple

dir

adding this as a 'tool', running it and this showed where VS was really trying to run nUnit.

If you look at the Tools menu, an extra option 'nUnit' now appears. When you click on this, it runs the console nunit against your compiled exe and pipes the output to a box in VS.NET onscreen.

13. Now try running NUnit. If you now have a button give it a click, otherwise use Tools|nUnit. You will see some stuff appear in your "output" pane.

If a command window pops up instead that is becuase you didn't check "Use Output Window" when adding the custom tool. Go back and edit the custom tool, check that option, then click the button again. Eventually you should see some text appear in the output pane that looks something like this:

Tests run: 0, Failures: 0, Not run: 0, Time: 0.016 seconds

Or more likely

Runtime Environment -
OS Version: Microsoft Windows NT 5.1.2600 Service Pack 2
CLR Version: 2.0.50727.42 ( Net 2.0.50727.42 )

..
Tests run: 2, Failures: 0, Not run: 0, Time: 0.320 seconds

Since you have two tests in your project.

14. Now you're all set.

Troubleshooting

I spent hours getting this message:

NUnit version 2.4.0
Copyright (C) 2002-2007 Charlie Poole.
Copyright (C) 2002-2004 James W. Newkirk, Michael C. Two, Alexei A. Vorontsov.
Copyright (C) 2000-2002 Philip Craig.
All Rights Reserved.
Runtime Environment -
OS Version: Microsoft Windows NT 5.1.2600 Service Pack 2
CLR Version: 2.0.50727.42 ( Net 2.0.50727.42 )

Could not load file or assembly 'nunit.framework, Version=2.4.0.2, Culture=neutral, PublicKeyToken=96d09a1eb7f44a77' or one of its dependencies. The system cannot find the file specified.

This comes when you run nUnit from within the Visual Studio IDE in the wrong directory!!! I.e. when you defined the "External tool" above, you probably pointed it to $(TargetDir). The latter points to C:\myvbnet\WindowsApplication1\WindowsApplication1\obj\Release, which contains a .exe (just to fool you) but not the nunit.framework.dll and nunit.framework.xml files.

It gets even better. You can find that just after you add the reference to an existing project, clicking on nUnit seems to run but finds no tests.

Tests run: 0, Failures: 0, Not run: 0, Time: 0.016 seconds

But if you then recompile the project, it changes to the "Could not load file or assembly 'nunit.framework" error.

To fix this:

  • Check whether you can run the tests using the NUnit GUI icon on your desktop, by navigating to your exe and opening that. If you can, it is certainly just a VS IDE configuration issue. If you cannot, I suggest you start using nunit-console in a CMD window as above, and diagnose things that way.
  • Check what you have in the Tools|External Tools for nUnit. Have you inadvertantly edited a different entry? (I found this desperately easy to do by accident) Make sure that you are pointing to the right .exe in the right directory, with the nunit.framework.* files in it.

Optional Stuff

1. Optionally (don't bother with this until everything is working) you can also add an icon on the toolbar to run nUnit.

Return to the "tools" menu and pick "customize". Another dialog pops up that lets you create new toolbars and to put buttons on existing toolbars. Lets not worry about creating a new toolbar just for our nUnit button. Instead click on the "commands" tab then in the left pane (Categories) scroll down and select "tools". The right pane (Commands) will populate. Scroll through there until you find "External Command 2" (if your nUnit was the second custom command) and then drag that command onto any of your existing VS 2005 toolbars. Finally, click the close button on the dialog and you will see your new buttons label change to "nUnit" (or whatever you called this tool).

2. Do you want to keep your test classes separate from the source classes? Most of us do!

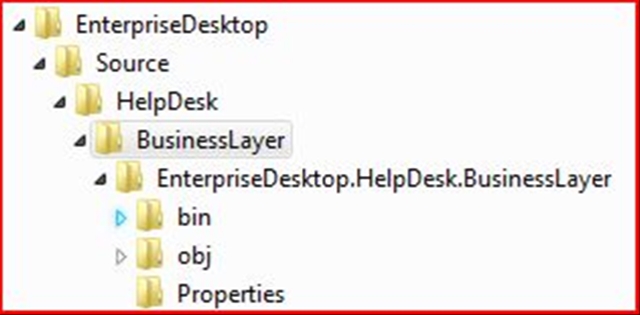
You don't have to let your .vb files sit where they are created. You can create a folder 'Source' under the project, drag the form1.vb to it, and the project will still work. This allows you to structure your files better. (There is also the argument that you ought to build separate 'assemblies' (i.e. dll's) rather than have one monster exe, but I haven't explored this).

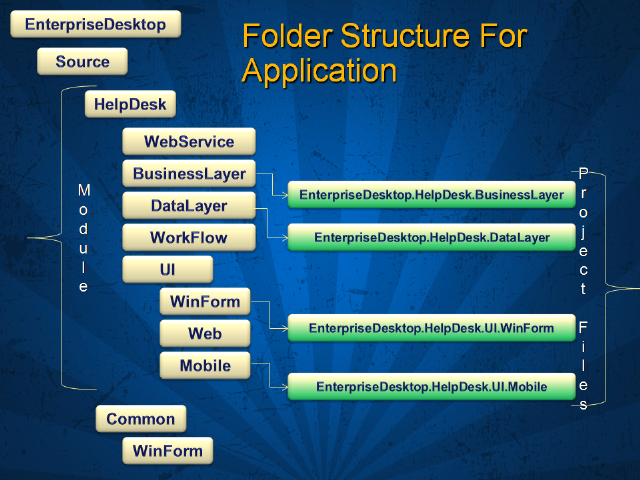
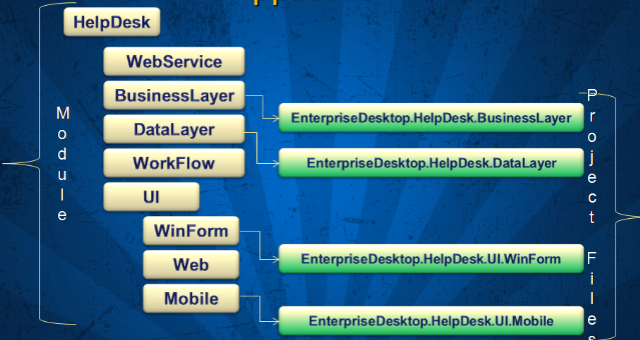
I have created two folders: src and test-src. I put the AppSettings.vb in the first, and the AppSettingsTests.vb in the second. It works well, and the extra files don't clutter my main development area. This makes my project look like this:

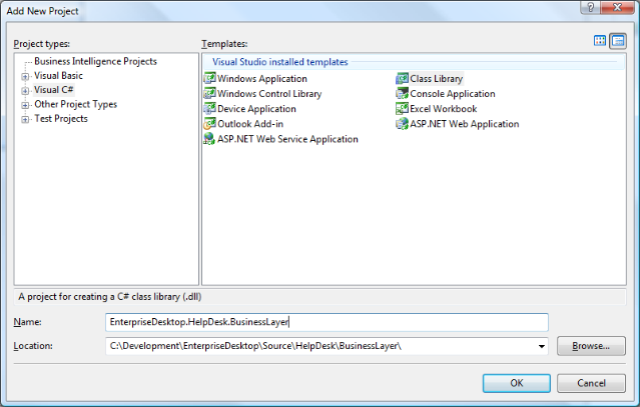
3. Do you really want your test classes in the live exe? Probably not. If so, try to put them into a dll, in a separate project in the same solution.

(Note that I haven't really worked out how to do this yet!)

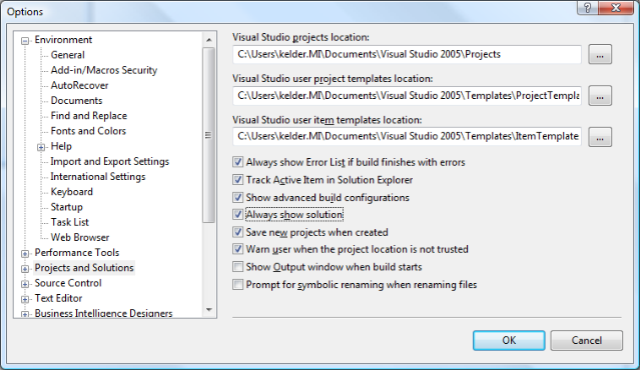
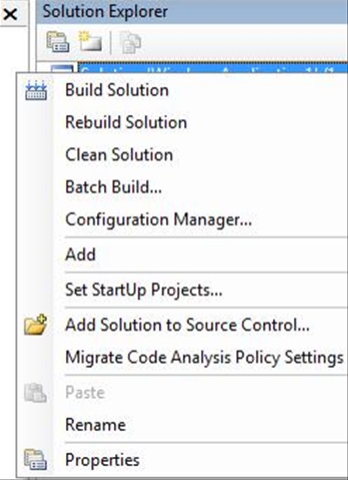
One difficulty is that the Solution (which owns the projects) is not shown by default in the above WindowsApplication1. This makes it hard to have multiple projects in the same solution. But this is merely an option on Tools|Options:

The Extended Agile Reading List

Here’s the extended one that includes either books that I’ve not read (and have been recommended) or those that help facilitate further understanding or more advanced practices.

Methodologies and principles

Additional context

Teamwork

Continuous Improvement

Project Management

Requirements and planning

Development practices

Reference: thekua.com@work

The Essential Agile Reading List

One of the searches that stumbled across my blog was the “Agile Coaching Reading List”. Running the same query returned a huge mish mash of lots of different things so I thought I’d put together my list of essential reads. Of course, simply reading the books won’t mean that you’re an expert (and I suggest working with another coach to develop that) though it’ll definitely help in providing context, advice or skills that you need to practice.

Methodologies and principles

Additional context

Teamwork

Continuous improvement

Requirements and planning

Development practices

Reference: thekua.com@work

BarcodeImage Generation Library

I found in CodeProject, an article containing Barcode image generation library.


screenshot.jpg

Types supported :
  • Codabar
  • Code11
  • Code 39(Extended / Full ASCII)
  • Code 128
  • EAN-8 EAN-13
  • Interleaved 2 of 5
  • ISBN
  • JAN-13
  • MSI
  • PostNet
  • Standard 2 of 5
  • UPC-A
  • UPC-E
  • UPC Supplemental 2
  • UPC Supplemental 5
Unfortunately EAN 128 even not supported.

Resources:

What versions of the .NET Framework are installed on your PC?

If you aren't sure which version(s) of the Microsoft .NET Framework are loaded on your PC, it can be a daunting task to find the desired info if you don't know where to look. Here are a couple of simple ways to check.

Method 1

Go to Programs and Features (Vista) or Add or Remove Programs (XP) in your Control Panel. Scroll down the list of installed applications until you find Microsoft .NET Framework the version will be listed next to the name.

Method 2

You can also use the command line to check the version by using the Windows Instrumentation command-line interface (WMIC). By using the Product command, you can easily pull up which version of the .NET Framework is installed. Simply open a command prompt and execute the following command:

wmic product where "name like 'Microsoft .NET Framework%'" get name,version

It will display something like this:


Reference : Tech Recipes