
Add auto update and plugins to your Java application

Auto update is a feature every desktop application should have ("real" users NEVER reinstall the latest version). Plugins is also a great way to enhance your application (let people code for you :) ).


There is some existing framework (Eclipse plugin, Netbean platform, Java web start (for the update) ...) which look great, but you have to learned how to use the whole platform (do I have mentioned I'm lazy ?), and you are tied to it. It was a lot more fun to code my own system :)


It's very simple to use and you should be able to have auto update AND plugins on your application with just a few lines of code. Let's look at his example :


@SuppressWarnings("serial")


public class TestProgram extends JFrame {


public TestProgram() {


super();


this.setDefaultCloseOperation(WindowConstants.DISPOSE_ON_CLOSE);


this.setTitle("test program");


this.setSize(200, 200);


}


/**


* @param args


*/


public static void main(String[] args) {


try {


TestProgram test = new TestProgram();


test
.setVisible(true);


} catch (Exception e) {


e
.printStackTrace();


}


}


}


This is a simple boring example app that just display a frame. We're going to make it a little more interesting by adding this jar to the classpath of the app.

The next thing to do is to add this lines of codes to the main method :


public static void main(String[] args) {


try {


TestProgram test = new TestProgram();


PlugEngine.getInstance().init(test);


UpdateDialog.showDialog();


PlugEngine.getInstance().startPluggables();


test
.setVisible(true);


} catch (Exception e) {


e
.printStackTrace();


}


}


PlugEngine.getInstance().init(test) initialize the plugin engine. You can give some parameters that will be given to the plugins when they will be started. Here I give the main class as a parameter, so that the plugins have an entry point in my application, but you could add more :


PlugEngine.getInstance().init(test, "a param", new Long(3));


Then UpdateDialog.showDialog() will display a popup that show the available updates, or do nothing is there is no updates :


PlugEngine.getInstance().startPluggables() will then start all the freshly update plugins.


We can now add a button that will display a popup which allow the user to manage all the installed plugin, and add more plugins :


public TestProgram() {


super();


this.setDefaultCloseOperation(WindowConstants.DISPOSE_ON_CLOSE);


this.setTitle("test program");


this.setSize(200, 200);


JButton button = new JButton("Show plugins");


button
.addActionListener(new ActionListener() {


public void actionPerformed(ActionEvent e) {


PluginDialog.showDialog();


}


});


this.getContentPane().add(button);


}


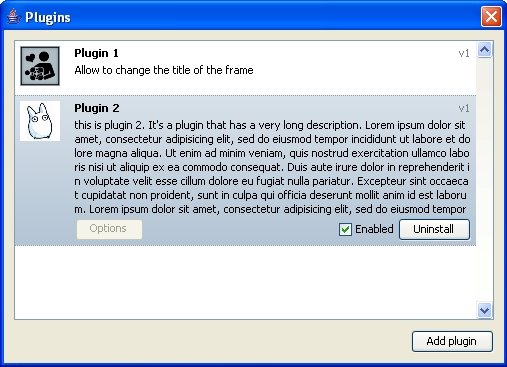
PluginDialog.showDialog() will open this popup :


That's all for you're app !


Now we can write our first plugin. A plugin is an implementation of Pluggable. You can also extends Plugin, which provide some default implementations of some of the methods from Pluggable :


public interface Pluggable {


/**


* @return the name for this plugin, should not be null


*/


public String getName();


/**


* @return the version for this plugin


*/


public String getVersion();


/**


* @return the description for this plugin


*/


public String getDescription();


/**


* @return the icon for this plugin


*/


public BufferedImage getIcon();


/**


* @return the place where the XML descriptor for this plugin can be found, should not be null


*/


public URI getURI();


/**


* this method will be called when the main program start if this plugin is installed


* @param args arguments given by the main program


*/


public void init(Object... args);


/**


* @return true if has some options to configure by the user


*/


public boolean hasOptions();


/**


* if hasOptions() return true, this method will be called when the user


* want to edit the options from this plugin.


*/


public void openOptions();


}


The plugin should also have an constructor without parameters. The init method will be called with the parameters from the main program when the plugin is launched.

Here an example which allow the user to change the title of the main frame :


public class Plugin1 implements Pluggable {


private String title;


private TestProgram prog;


public void init(Object... args) {


if (args != null && args.length > 0 && args[0] instanceof TestProgram) {


prog
= (TestProgram) args[0];


title
= prog.getTitle();


}


}


public void openOptions() {


title
= JOptionPane.showInputDialog(null, "Choose a new title :", title);


System.out.println(title);


prog
.setTitle(title);


}


public String getName() {


return "Plugin 1";


}


public String getVersion() {


return "v1";


}


public String getDescription() {


return "Allow to change the title of the frame";


}


public URI getURI() {


try {


return new URI("http", "lebesnec.free.fr", "/plugin1.xml", null);


} catch (URISyntaxException e) {


e
.printStackTrace();


return null;


}


}


public boolean hasOptions() {


return true;


}


private BufferedImage icon;


public BufferedImage getIcon() {


try {


if (icon == null) {


URL imageURL
= getClass().getResource("portal.jpg");


icon
= ImageIO.read(imageURL);


}


} catch (Throwable e) {


e
.printStackTrace();


return null;


}


}


}


Once the plugin is written it should be packaged as a JAR file.

The getURI method should return the path to a XML file on the internet which indicate where to download the JAR file, the current version and the main class of the plugin :


xml version="1.0" encoding="UTF-8"?>


<plugengine>


<plugin>


<version>v1version>


<source>file:/C:/eclipse/workspace/plug-engine test plugin/plug1.jarsource>


<class>Plugin1class>


plugin>


plugengine>


So if i made a new version of the plugin I just have to replace the Jar on my website and update the version number in this XML file (and in the java code of the plugin). The plugin will then automatically be displayed in the updates, if you have installed it on the "plugins" windows.


To install a new plugin you have to download this XML file, open the "plugins" windows, choose "Add plugin" and open the file (no need to restart the application).


Ok, now what if i want to make my application "updatable" ? Simply package it as a plugin ! The list of all the installed plugin is stored in a file "plugengine.xml" at the root of your app :


xml version="1.0" encoding="ISO-8859-1"?>


<plugengine>


<plugin enabled="true" hidden="false" update="true">


<source>plugins/plug1.jarsource>


<class>Plugin1class>


plugin>


<plugin enabled="true" hidden="false" update="true">


<source>plugins/plug2.jarsource>


<class>Plugin2class>


plugin>


plugengine>


You can manually add your application as a plugin in this file. Also set hidden to true in this file for your plugin and it will not appear in the "plugins" windows, so users will not be able to remove or disable it.


Voilà your application is now auto-updatable and support plugins !

(If your not a swing user or want to write your own updates and plugins windows, just use the methods from PlugEngine instead of UpdateDialog and PluginDialog). (I will not cover this here but it should be easy, the methods are straightforward)


Remember that this is just experimental for the moment, there is probably a lot of bugs, and I have tested it only under Windows and Java 5. Also, don't forget that the plugins don't run in a sandbox, they have full access to the system like your application. May i just reinventing the wheel here, but it was still very funny to do :)


Here is the test application from the example. Once downloaded, run it (java -classpath test.jar;plug-engine.jar test.TestProgram) and click the button to open the plugins windows. You can then download and install this plugin. It will also appear as an update each time you run the application (until you uncheck it in the update box).


You can also download the sources (from the library, the example application and the example plugin).

And the jar for the plug engine, if you want to use it in your application.


Things to improve/add :

- internationalization

- drag&drop of the xml file in the plugins dialog to install

- use a version number for the main app. If the plugin is designed for a lower version, disabled it

- allow plugin to have more than one JAR file (packaged in zip file for example)


PS : it was incredibly hard to write the custom list component from the plugins and updates dialog, particularly the "extend" effect. I think I will write about this later.


The Easiest Java XML Binding

I have an XML document and I want to use that document to populate a corresponding set of Java objects. This is a commonly encountered scenario when working with Java, so what is the easiest method for Java XML Binding that requires the least amount of code? You can't answer that question without first defining what "easy" is in relation to the bindings between Java and XML. To me "easy" is synonymous with "simple," so I am equating easiness to complexity. Complexity is of interest because things that are complex take longer to implement and are generally harder to maintain, based on my experiences with software in a variety of languages and platforms. Less code written means less code to maintain, and less code to write means less time is required to write that code.

So what are the methods for binding Java and XML?

  • JAXB - Requires Java Web Services Developer Pack v1.1 or later and the use of XSD's to bind the corresponding XML to Java interfaces (http://java.sun.com/developer/technicalArticles/WebServices/jaxb/).
  • JiBX - Open source project that uses binding definition documents to describe how XML is mapped to Java objects at binding runtime, where enhanced class files generated by the binding compiler build objects from an XML input document and can be outputted as XML documents (http://jibx.sourceforge.net/).
  • SAX/DOM/JAXP/Xerces-J - These are all types of Java XML parsers that require the manual handling of XML documents, meaning that you have to [in general] manually map the values from an XML document to the corresponding Java object (http://www.cafeconleche.org/books/xmljava/chapters/ch05.html).
  • Spring Beans - Uses the Inversion of Control container from the Spring Framework in order to bind values from special "bean" xml documents to Java classes. This is not useful for reading a specific XML document, but it is the binding that is of interest ; the automatic mapping of XML value to Java object field. (http://jvalentino.blogspot.com/2007/10/introduction-to-spring-framework.html).
  • EJB Beans - Enterprise Java Beans are a subject unto themselves, far to broad for discussion here. What is important though as with the inversion of control container from the Spring Framework, is the ability to bind values from XML documents to Java object fields (http://java.sun.com/javaee/5/docs/tutorial/doc/bnblr.html).

I have used all of these methods in depth before, but this isn't exactly what I want though:

  • I don't want to have to manually iterate through XML documents and manually map values.
  • I don't want to have to use XSD files.
  • I don't want to have to use libraries for binding compilers to use binding definitions to map to Java classes.
  • I don't want to have to modify existing XML documents so that I can use them as beans.

I know exactly what I want: I want to have a series of Java objects that are representations of nodes within an XML document, and pass the XML document to the Java object representing the root XML node and have all of the corresponding Java objects populate using that XML. I then want to be able to go from Java back to XML, and I don't want to have to do anything other then say "XML, go to Java" and then "Java, go to XML."

Why should there need to be complex mappings and external definitions when Java and XML are being used to representing the same thing?

Consider an RSS 2.0 document and what it represents:

 version="1.0"?>

version="2.0">

>

>Lift Off News>

>http://liftoff.msfc.nasa.gov/>

>Liftoff to Space Exploration.>

>en-us>

>Tue, 10 Jun 2003 04:00:00 GMT>

>Tue, 10 Jun 2003 09:41:01 GMT>

>http://blogs.law.harvard.edu/tech/rss>

>Weblog Editor 2.0>

>editor@example.com>

>webmaster@example.com>

>5>


>

>Star City>

>http://liftoff.msfc.nasa.gov/news/2003/news-starcity.asp>

>How do Americans get ready to work with Russians aboard the

International Space Station? They take a crash course in culture, language

and protocol at Russia's Star City.>

>Tue, 03 Jun 2003 09:39:21 GMT>

>http://liftoff.msfc.nasa.gov/2003/06/03.html#item573>

>


>

>Space Exploration>

>http://liftoff.msfc.nasa.gov/>

>Sky watchers in Europe, Asia, and parts of Alaska and Canada

will experience a partial eclipse of the Sun on Saturday, May 31st.>

>Fri, 30 May 2003 11:06:42 GMT>

>http://liftoff.msfc.nasa.gov/2003/05/30.html#item572>

>


>

>The Engine That Does More>

>http://liftoff.msfc.nasa.gov/news/2003/news-VASIMR.asp>

>Before man travels to Mars, NASA hopes to design new engines

that will let us fly through the Solar System more quickly. The proposed

VASIMR engine would do that.>

>Tue, 27 May 2003 08:37:32 GMT>

>http://liftoff.msfc.nasa.gov/2003/05/27.html#item571>

>


>

>Astronauts' Dirty Laundry>

>http://liftoff.msfc.nasa.gov/news/2003/news-laundry.asp>

>Compared to earlier spacecraft, the International Space

Station has many luxuries, but laundry facilities are not one of them.

Instead, astronauts have other options.>

>Tue, 20 May 2003 08:56:02 GMT>

>http://liftoff.msfc.nasa.gov/2003/05/20.html#item570>

>

>

>

Document from http://en.wikipedia.org/wiki/RSS_(file_format)

An "rss" node has a "channel" node, a "channel" node has "item" nodes, and every node has their own properties and attributes. These relationships can then be represented in terms of objects using a class diagram (ignoring methods for getters and setters):

From this class diagram it is then possible to generate the corresponding Java classes, assuming that the class fields have the same names as their corresponding XML nodes. This can't always work though since class fields can be represented in XML as properties or attributes, so it would be necessary to designate this in Java. You may also not want to have the Java class field names the same as the XML node names, so there would need to be a way to designate this as well. One easy way to designate specific things about classes, fields, and methods is to use annotations, so consider the following 3 annotations:

  1. @ClassXmlNodeName - used on a Java class to specify its corresponding node name in an XML document. This is required in order to designate a class as being bound to an XML document.
  2. @XmlAttributeName - used on a Java field to specify its corresponding attribute name in an XML document. This is required in order to specify that a particular class field should be represented in XML as an attribute instead of a property.
  3. @XmlNodeName - used on a Java field to specify its corresponding node name in an XML document. This is only required when a Java class field name is different than its corresponding XML node name.
@ClassXmlNodeName("rss")

public class Rss {

private List channels;

@XmlAttributeName("version")

private String version;


//getters and settings go here...

}


@ClassXmlNodeName("channel")

public class Channel {

private String title;

private String link;

private String description;

private String language;

private String pubDate;

private String lastBuildDate;

private String docs;

private String generator;

private String managingEditor;

private String webMaster;

private int ttl;

private List items;


//getters and settings go here...

}


@ClassXmlNodeName("item")

public class Item {

private String title;

private String link;

private String description;

private String pubDate;

private String guid;


//getters and settings go here...

}

With the exception of the annotations, these Java classes are just like any other data transfer objects (DTOs) that would be used to represent a RSS XML document. These annotations act as the mappings between Java and XML when names and types do not provide enough information. With this information, the class representing the XML document root node, and the XML document it is possible to recursively map XML nodes to Java class fields and Java class fields back to XML nodes using Reflection. So using Reflection I wrote a library that can take any Plain Old Java Object (POJO) and an XML document, and use that XML document to populate that object and all of its child objects using one line of code. The same can then be done to convert a Java object back to its XML representation using a single line of code. All of this assuming that the Java classes correspond to the XML document.

Using this "XML Binder" library the following code takes the the given instance of an Rss object and populates it and its channels and items using the given XML document:

Rss rss = new Rss();

XmlBinderFactory.newInstance().bind(rss,
new File("Rss2Test.xml"));

The following code can then be used to take that same Rss object once changes have been made to it and converts it back to XML:

String xml = XmlBinderFactory.newInstance().toXML(rss);

I assert that this can work with most XML documents that have appropriate corresponding Java classes, but I have only tested it out so far with RSS 1.0, RSS 2.0, and a general test XML document in no particular format. The question now is what do I do with this library; anyone interested?

Since there seems to be some interest I have started a sourceforge.net project called "Really Easy Java XML Binding" or "RE:JAXB" since this is sort of a reply to JAXB. Here is the link

I have included POJOs for RSS 1.0 and RSS 2.0 along with unit tests to verify that the mappings from XML and to XML are working correctly. What I am looking for are ways to improve the efficiency of the to and from binding code, as well as POJOs for other common XML formats.

child objects using one line of code. The same can then be done to convert a Java object back to its XML representation using a single line of code. All of this assuming that the Java classes correspond to the XML document.

Using this "XML Binder" library the following code takes the the given instance of an Rss object and populates it and its channels and items using the given XML document:

Rss rss = new Rss();

XmlBinderFactory.newInstance().bind(rss,
new File("Rss2Test.xml"));

The following code can then be used to take that same Rss object once changes have been made to it and converts it back to XML:
String xml = XmlBinderFactory.newInstance().toXML(rss);

I assert that this can work with most XML documents that have appropriate corresponding Java classes, but I have only tested it out so far with RSS 1.0, RSS 2.0, and a general test XML document in no particular format. The question now is what do I do with this library; anyone interested?

Since there seems to be some interest I have started a sourceforge.net project called "Really Easy Java XML Binding" or "RE:JAXB" since this is sort of a reply to JAXB. Here is the link

I have included POJOs for RSS 1.0 and RSS 2.0 along with unit tests to verify that the mappings from XML and to XML are working correctly. What I am looking for are ways to improve the efficiency of the to and from binding code, as well as POJOs for other common XML formats.

Refer: Software Everything

Switch from synchronous to asynchronous processing at runtime

Asynchronous processing is a must for many Java EE or Web-based applications -- but who has time to set up and configure JMS? In this article Di Wang shows you how to decouple your architecture so that it accommodates both synchronous and asynchronous processing. Then you can develop your business logic synchronously and plug in the JMS at runtime. The decoupled architecture enables a quicker development cycle, and also makes it easier to switch from asynchronous to synchronous processing in a deployed application.

It's a common problem in client-server applications that the server spends too much time processing data. Many of us use asynchronous processing, by way of JMS (the Java Message Service API), to get around this problem. JMS is a proven, mature technology that is supported by the Java EE specification. It's also time-consuming and complicated to work with.

Using JMS entails first setting up the JMS provider and message listener (a message-driven bean, or MDB, in many cases). In order to develop and test a JMS application from end to end you need to do the following, at minimum:

  • Specify the JMS provider
  • Define a physical queue or topic
  • Define a connection factory
  • Associate the physical queue or topic with a JMS JNDI name
  • Define an activation specification if using the JCA (Java Connector Architecture)

No matter what IDE or application server you use, these steps are required. While JMS is a Java EE standard, each JMS provider is a vendor-specific implementation that could require various configuration tasks. Some vendors provide scripts to expedite the setup; but learning the script itself might be a challenge. Many Java developers would agree that the JMS configuration process is tedious, error prone, and even obscure, if not exasperating.

As an alternative to using JMS you could code your business logic using POJOs and then unit test those objects. But it's often the case that meaningful test data can only be gathered if the full work flow of the application is tested. In other words, you still have to go across different layers of your Java EE architecture to create a valid request.

In this article I propose a third option -- a way to reap the benefits of asynchronous processing without the burden of configuring JMS during the development process. In the discussion that follows, I explain how to build an application that runs synchronously for most of the development process, but can then be switched to run asynchronously when you're ready to add JMS to the picture. One of the benefits of this approach is that developers are free to focus on business logic during the development cycle (as you would with a POJO-based solution) without losing the benefits of JMS.

A decoupled architecture

Imagine an application scenario where a client sends a request to a business object (BO), which in turn delegates the processing to a processor. To achieve this goal, you could decouple the BO and the processor and place between them a middle layer, called an Invoker. Instead of calling the processor directly, the BO calls the Invoker, which references the processor. In this case, the Invoker is just an interface with different implementations: synchronous and asynchronous. The introduction of the Invoker changes the workflow of the application. The architecture diagram for the sample application is shown in Figure 1, and the Invoker interface is shown in Listing 1.

Figure 1. Sample architectural diagram, showing the Invoker

Listing 1. The Invoker interface

...
/**
 * The Invoker interface is used to define various invoker implementation
 * strategies. An invoker can be a synchronous invoker or a JMS-based  
 *asynchronous invoker.
 *
 */
public interface Invoker {   
    public void invoke(Serializable request);
}

Invoker is referenced by the business layer. As you can see in Listing 1, the interface defines only one method, which takes a serializable object as its input argument. The serializable interface is required by the MDB when the message casts to an object.

The SynchronousInvoker implementation of Invoker, shown in Listing 2, provides a synchronous architecture for the system. It references the processor directly.

Listing 2. SynchronousInvoker

...
public class SynchronousInvoker implements Invoker {        
    /**
     * Synchronously invokes the request.
     */
    public void invoke(Serializable request){
            new MyProcessor().process(request);
    }
}

JMSInvoker, together with the MDB, provides an asynchronous architecture for the system. This implementation of the interface is shown in Listing 3. Instead of talking to the processor directly as SynchronousInvoker does, JMSInvoker just drops the message onto a Queue or a topic, then returns control immediately.

Listing 3. JMSInvoker

...
/**
 * A JMS MDB based asynchronous implementation of the invoker.
 */
public class JMSInvoker implements Invoker {
 
    /**
     * Asynchronously (JMS) invokes the specific request.
     */
    private final static String ConnectionFactory = "jms/ClaimConnectionFactory";
    private final static String Queue = "jms/ClaimQueue";
   
    public void invoke(Serializable request){
        try{
            Context ctx = new InitialContext();
            ConnectionFactory cf = (ConnectionFactory)
            ctx.lookup(ConnectionFactory);
            Destination outDest = (Destination) ctx.lookup(Queue);
            Connection connection = cf.createConnection();
            Session session = connection.createSession(false,Session.AUTO_ACKNOWLEDGE);
            MessageProducer destSender = session.createProducer(outDest);           
            ObjectMessage ooutMessage = session.createObjectMessage(request);
            destSender.send(ooutMessage);
            destSender.close();
            session.close();
            connection.close();
        }catch(Exception e){
            String error = "Error in JMS invoker: " + e.getMessage();           
        }
    }
 
}

Sitting in the EJB container, ProcessMDBBean, shown in Listing 4, receives the message, casts the message to the request object, and passes it along to the processor.

Listing 4. ProcessMDBBean

...
 
/**
 * Bean implementation class for Enterprise Bean: ProcessMDB
 */
public class ProcessMDBBean
    implements
        javax.ejb.MessageDrivenBean,
        javax.jms.MessageListener {
...
    /**
     * onMessage
     */
    public void onMessage(javax.jms.Message msg) {       
        java.io.Serializable request = null;
        try {
                //call the application processor       
      new MyProcessor().process(request);
        } catch (Exception e) {
            // TODO Auto-generated catch block
            e.printStackTrace();
        }               
       
    }
}

This is where the real business logic goes. MyProcessor, shown in Listing 5, processes the request object passed in.

Listing 5. MyProcessor

...
public class MyProcessor {
 
    public void process(Serializable request){
        //processing request here...
    }       
}

At the business layer, MyBO, shown in Listing 6, retrieves an Invoker instance from the InvokerFactory, shown in Listing 7, and lets the Invoker do the processing.

Listing 6. MyBO

...
public class MyBO  
 
{
   
    public String submitClaim(Claim myClaim){
       
            /* Delegate call to invoker to invoke the specific request:
             *
             * Note: The invoker is a synchronous or asynchronous
             * process based on the specific implementation used. */               
        InvokerFactory.getInstance().invoke(myClaim);           
       
        return myClaim.getClaimId();
    }   
}

Listing 7 shows the InvokerFactory.

Listing 7. InvokerFactory

...
public class InvokerFactory {
private InvokerFactory(){};
private static HashMap map = new HashMap();
    private static boolean _isSynchronous = true; 
    
    public static void setSynchronous(boolean syncFlag){
        _isSynchronous = syncFlag;
    }
 
    public static boolean getSynchronous(){
        return _isSynchronous;
    }
 
    public static synchronized Invoker getInstance() {      
    //load synchronous invoker
    String syncClassName = PropertyReader.getProperties().getProperty("SYNC_INVOKER_CLASS").trim();
        Invoker synchSingleton = map.get(syncClassName);        
        if (synchSingleton == null){
            try{
        synchSingleton = (Invoker) Class.forName(syncClassName).newInstance();
            }
            catch(Exception e){e.printStackTrace();}            
            map.put(syncClassName, synchSingleton);
        }
        
        //load asynchronous invoker
        String asyncClassName = PropertyReader.getProperties().getProperty("ASYNC_INVOKER_CLASS").trim();
        Invoker asynchSingleton = map.get(asyncClassName);      
        if (asynchSingleton == null){
            try{
        asynchSingleton = (Invoker) Class.forName(asyncClassName).newInstance();
            }
            catch(Exception e){e.printStackTrace();}            
            map.put(asyncClassName, asynchSingleton);
        }
 
        return _isSynchronous?synchSingleton:asynchSingleton;
    }
}

The InvokerFactory loads both Invokers initially, then returns the appropriate one based on the value of isSynchronous. isSynchronous can be changed at runtime.

Deployment processes

To fully take advantage of this approach, a technical lead in your development team should take responsibility for setting the Java EE and EJB module dependencies. At the beginning of the development process, the technical lead unchecks the EJB module dependency at the EAR module, and checks in the code to source control. Once the code has been checked out from source control, the rest of the development team can focus on developing the core business logic using a synchronous architecture. A screenshot of these settings in Rational Application Developer is shown in Figure 2; obviously the equivalent is possible in any IDE.

Figure 2. Setting the dependencies

At the end of the development process, when you're ready to test the application, the technical lead can mark the EJB module dependencies for the EAR module and set up the JMS provider. Depending on the server vendors chosen, the technical lead might have to do some MDB configuration tasks as well. When the rest of the development team checks out the code from the SCM this time, they can use admin tools to switch the nature of the workflow. For instance, a JSP page like the one shown in Figure 3 would allow developers working on this application to toggle between the two invoker options.

Figure 3. AdminPage.jsp

Benefits and limitations of using the Invoker interface

While this technique can save time and trouble during the development process, it isn't suitable for every application scenario. If the application's asynchronous architecture differs too much from the synchronous version, the time saved during development might be wasted, as any asynchronous-specific features will need to be tested out in the asynchronous environment. For instance, if a feature requires that a customer asynchronously send requests and then work on other tasks while waiting for the confirmation, you cannot test this feature in the synchronous sequence.

In conclusion

Using the Invoker interface to decouple your architecture gives your application the flexibility to change from synchronous to asynchronous processing at runtime. This flexibility can help increase your development team's productivity by deferring JMS configuration and delegating it to a central resource, such as a technical lead.

You can even leverage the flexibility of the Invoker interface in a production environment. For instance, if an application's processing time is shorter than expected, users could tweak the workflow from asynchronous to synchronous processing for the sake of simplicity (so long as the application functions similarly in both scenarios). Whether you use the technique outlined here in a live application or just in a development environment, the ability to switch between synchronous and asynchronous processing should simplify your life and add flexibility to your development solutions.